
If you have a can of sweetened condensed milk and an Instant Pot, you are just one button away from the creamiest, dreamiest homemade dulce de leche.
This Instant Pot dulce de leche recipe creates a smooth, rich homemade caramel sauce using just one ingredient: sweetened condensed milk. I have tested this recipe dozens of times over the past few months while creating Instant Pot dessert content, and after plenty of experimenting, I landed on the exact timing that creates perfectly smooth, creamy dulce de leche every single time.
No standing over the stove, stirring or worrying about scorching. Just one ingredient, a mason jar and your Instant Pot doing all the work. It still feels a little bit like kitchen magic every time I make it.
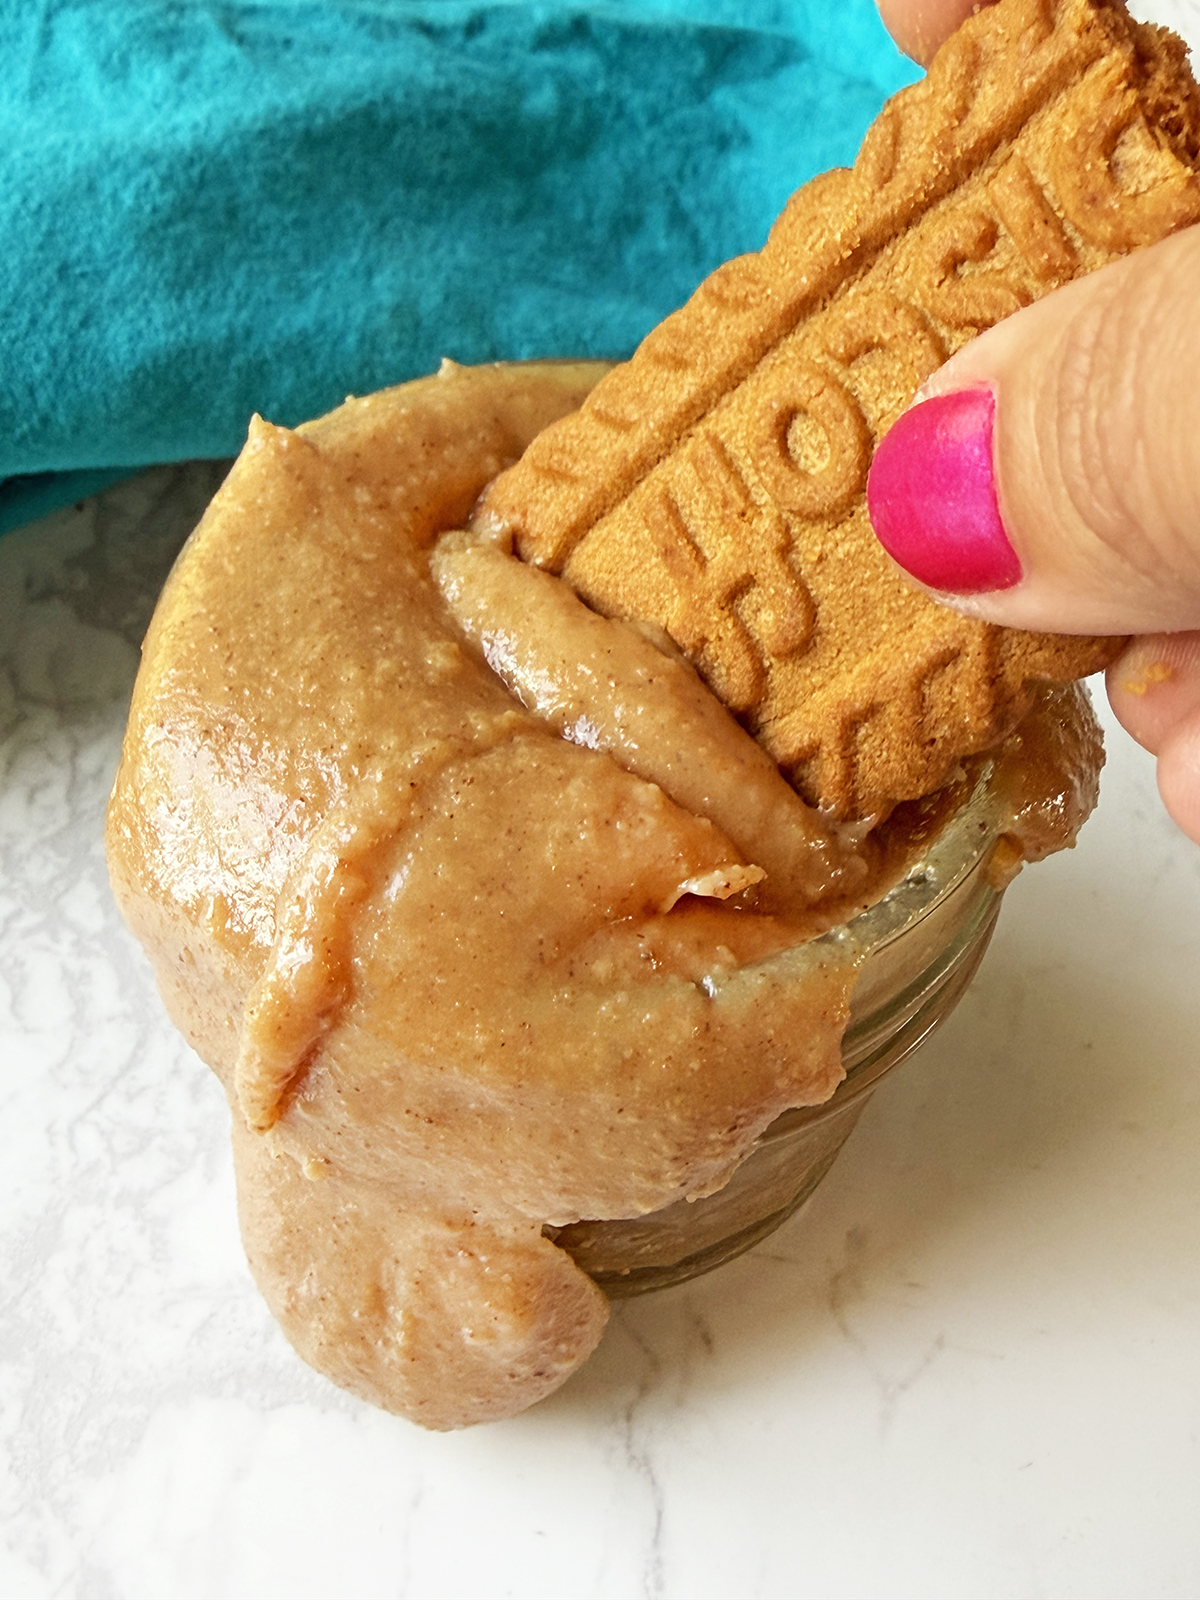
Dulce de leche literally translates to “milk candy,” and that’s exactly what you’ll end up with: a rich, silky caramel sauce that tastes like it took hours of effort. Use it as a dip for apples, drizzle it over ice cream, swirl it into cheesecake, spoon it over brownies or enjoy it straight from the jar (no judging).
If you love easy desserts, unexpected Instant Pot recipes and kitchen shortcuts that actually work, this recipe is about to become one of your favorites.
Looking for more sweet treats? Check out my collection of the best Instant Pot desserts.
What Is Dulce de Leche?
Dulce de leche is a sweet caramel-like sauce popular throughout Latin America. Its name literally translates to “milk candy.” It is traditionally made by slowly heating milk and sugar until thick and caramelized. This Instant Pot version delivers the same rich flavor with much less effort.
Instant Pot Dulce de Leche at a Glance
- What is it? A rich homemade caramel sauce made from sweetened condensed milk.
- Ingredients: 1 ingredient
- Cook time: 18 minutes high pressure
- Natural release: 10 minutes
- Difficulty: Easy
- Best for: Cheesecake, ice cream, brownies, fruit and dessert toppings
Why This Recipe Works
- One ingredient, big payoff. A humble can of sweetened condensed milk transforms into a rich, silky homemade caramel sauce that tastes like it took hours to make.
- Zero babysitting required. No standing at the stove. No stirring. No wondering if you’re about to burn a batch of caramel. Just press a button and let your Instant Pot do the work.
- I’ve done the testing for you. After making this recipe dozens of times, I landed on the exact timing that creates perfectly smooth, creamy dulce de leche every single time.
- It feels like kitchen magic. Watching sweetened condensed milk turn into dreamy caramel never gets old. Every time I make it, I still think, “There’s no way this should work this well.”
- So many delicious ways to use it. Drizzle it over ice cream, cheesecake, brownies and apple slices, swirl it into frosting or enjoy it straight from the spoon. I won’t tell (because I do this all the time).
- Make it once, enjoy it for days. Keep a jar in the fridge and warm it up whenever you need a little caramel goodness in your life.
Recipe Ingredients
This might be the shortest ingredient list you’ll ever see, but don’t let that fool you! One simple ingredient transforms into a rich, creamy homemade caramel sauce that’s perfect for drizzling, dipping and sneaking spoonfuls straight from the jar.
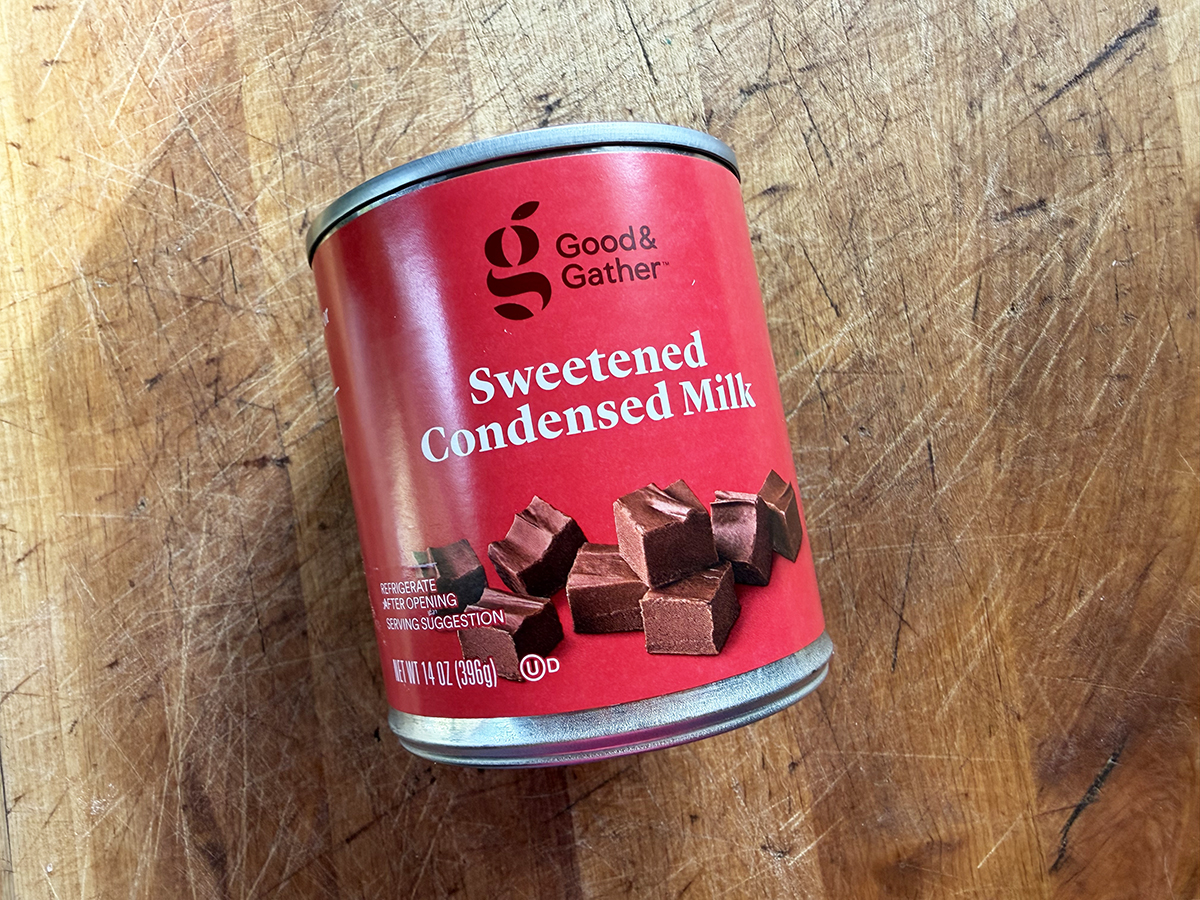
- Sweetened condensed milk – The star of the show. As it cooks under pressure, the sugars slowly caramelize, creating smooth, perfect dulce de leche with deep caramel flavor.
You’ll also need: An Instant Pot, a trivet, a pint-sized mason jar and silicone hot pad holders for safely removing the hot jar from the pressure cooker.
Tip: Use a standard 14-ounce can of sweetened condensed milk for best results. I’ve tested this recipe many times using this amount and it consistently creates the perfect texture and flavor.
How to Make Instant Pot Dulce de Leche
- Fill the jar.
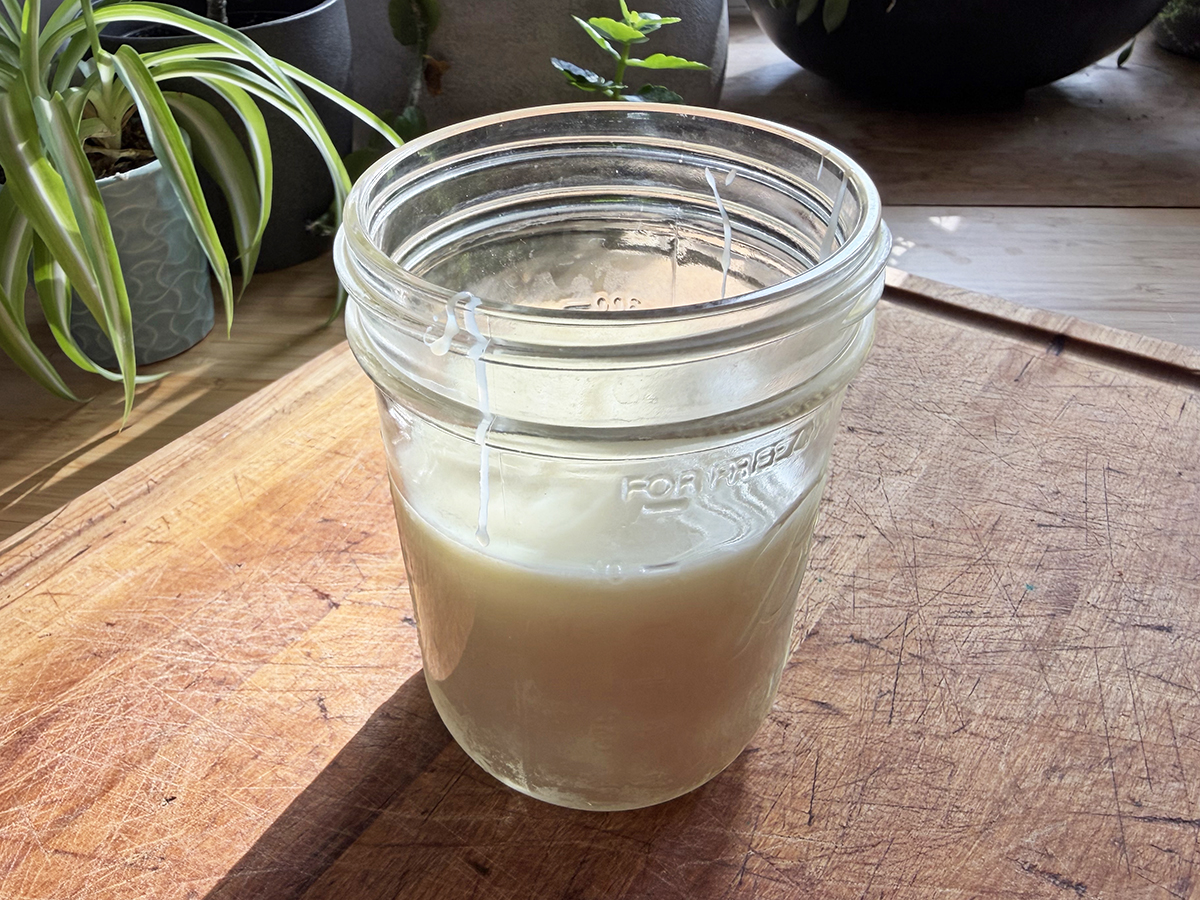
Pour the sweetened condensed milk into a pint-sized mason jar and secure the lid loosely. There’s no need to tighten it completely.
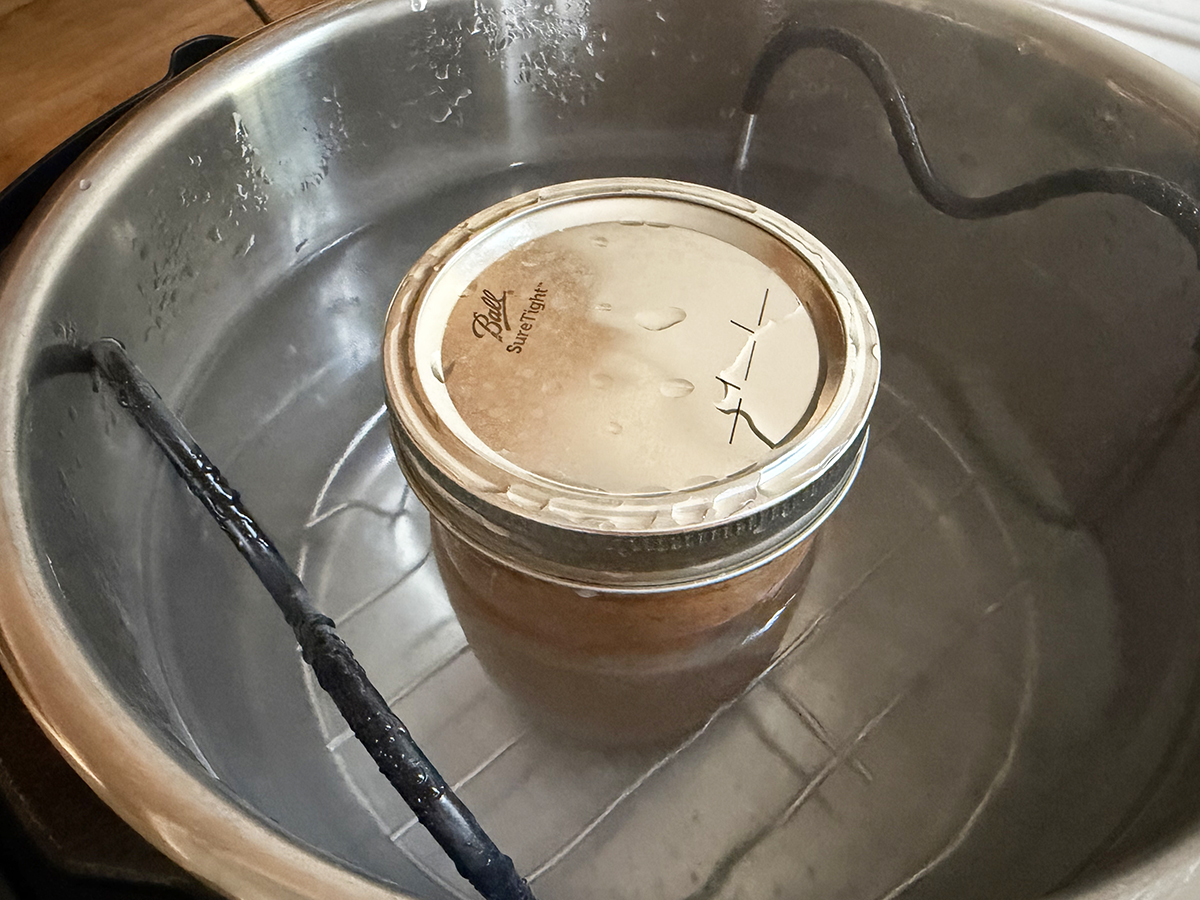
- Set up the Instant Pot.
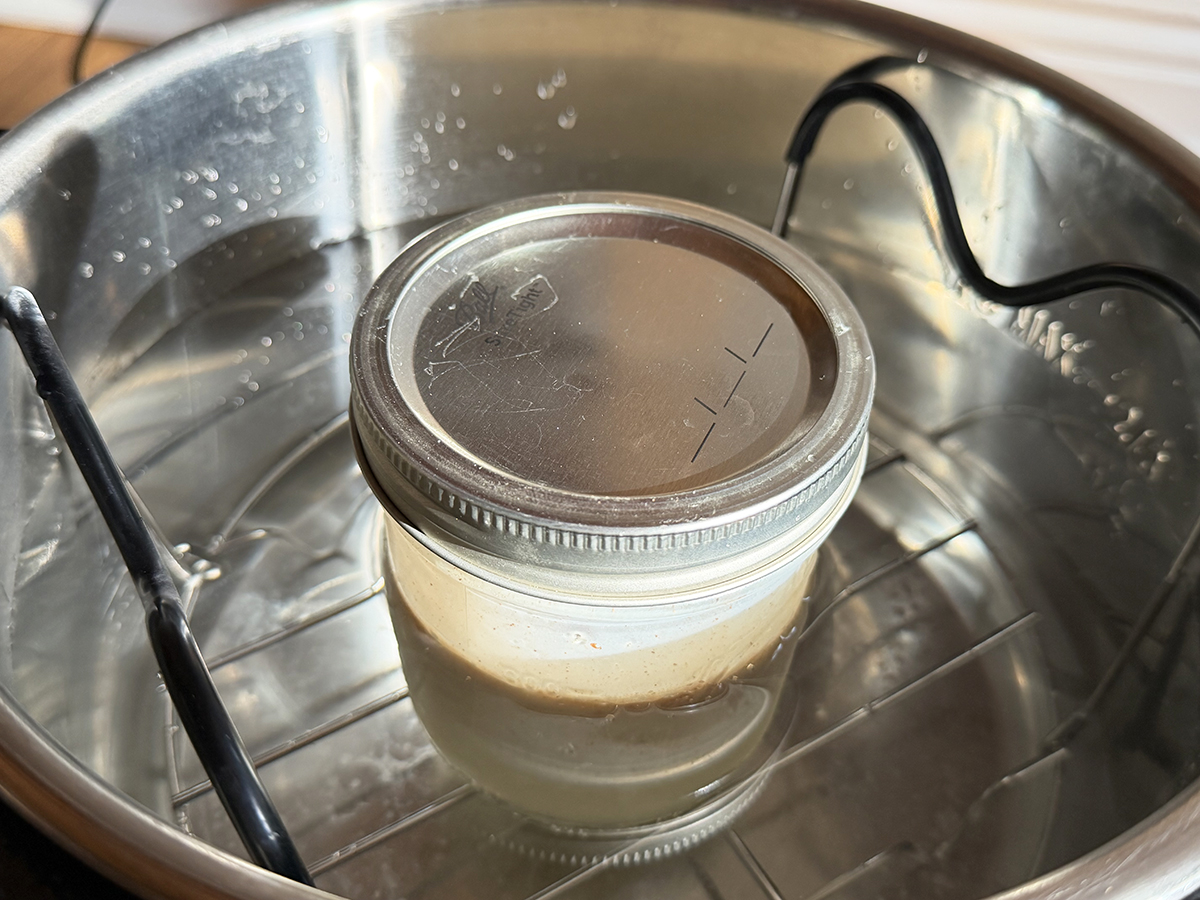
Place a trivet inside the Instant Pot and set the mason jar on top, making sure it sits securely in the center. - Add water.
Pour water into the pot until the water level reaches the same height as the sweetened condensed milk inside the jar.
- Pressure cook.
Secure the lid and set the valve to the sealing position. Cook on High Pressure using the Pressure Cook setting for 18 minutes. Because there is a large amount of water in the pot, expect it to take about 30 minutes to come to pressure. - Natural release.
When the cooking time is up, allow the pressure to release naturally for 10 minutes before carefully venting any remaining pressure.
- Remove cover.
Once the float valve drops, remove the lid and carefully lift the jar out of the pot using hot pads or jar tongs.
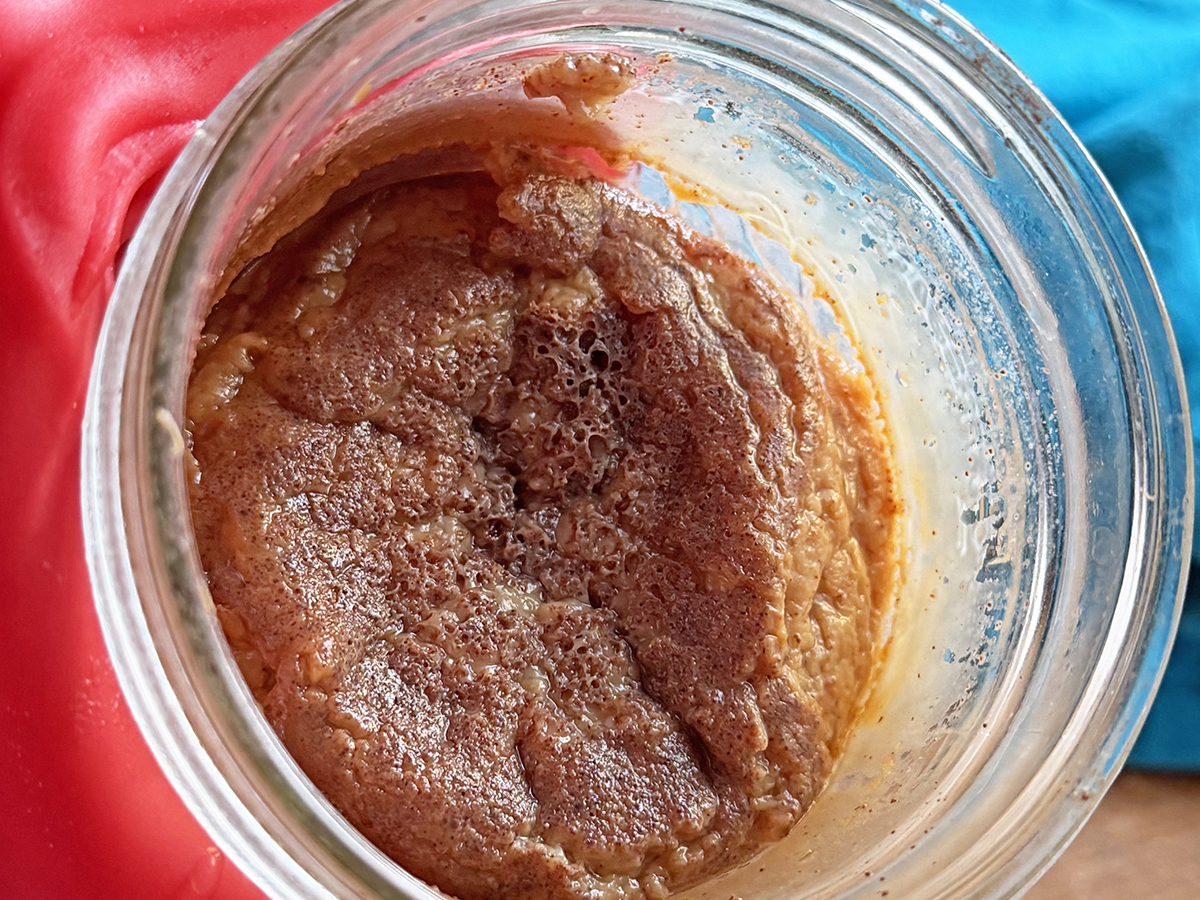
- Check appearance.
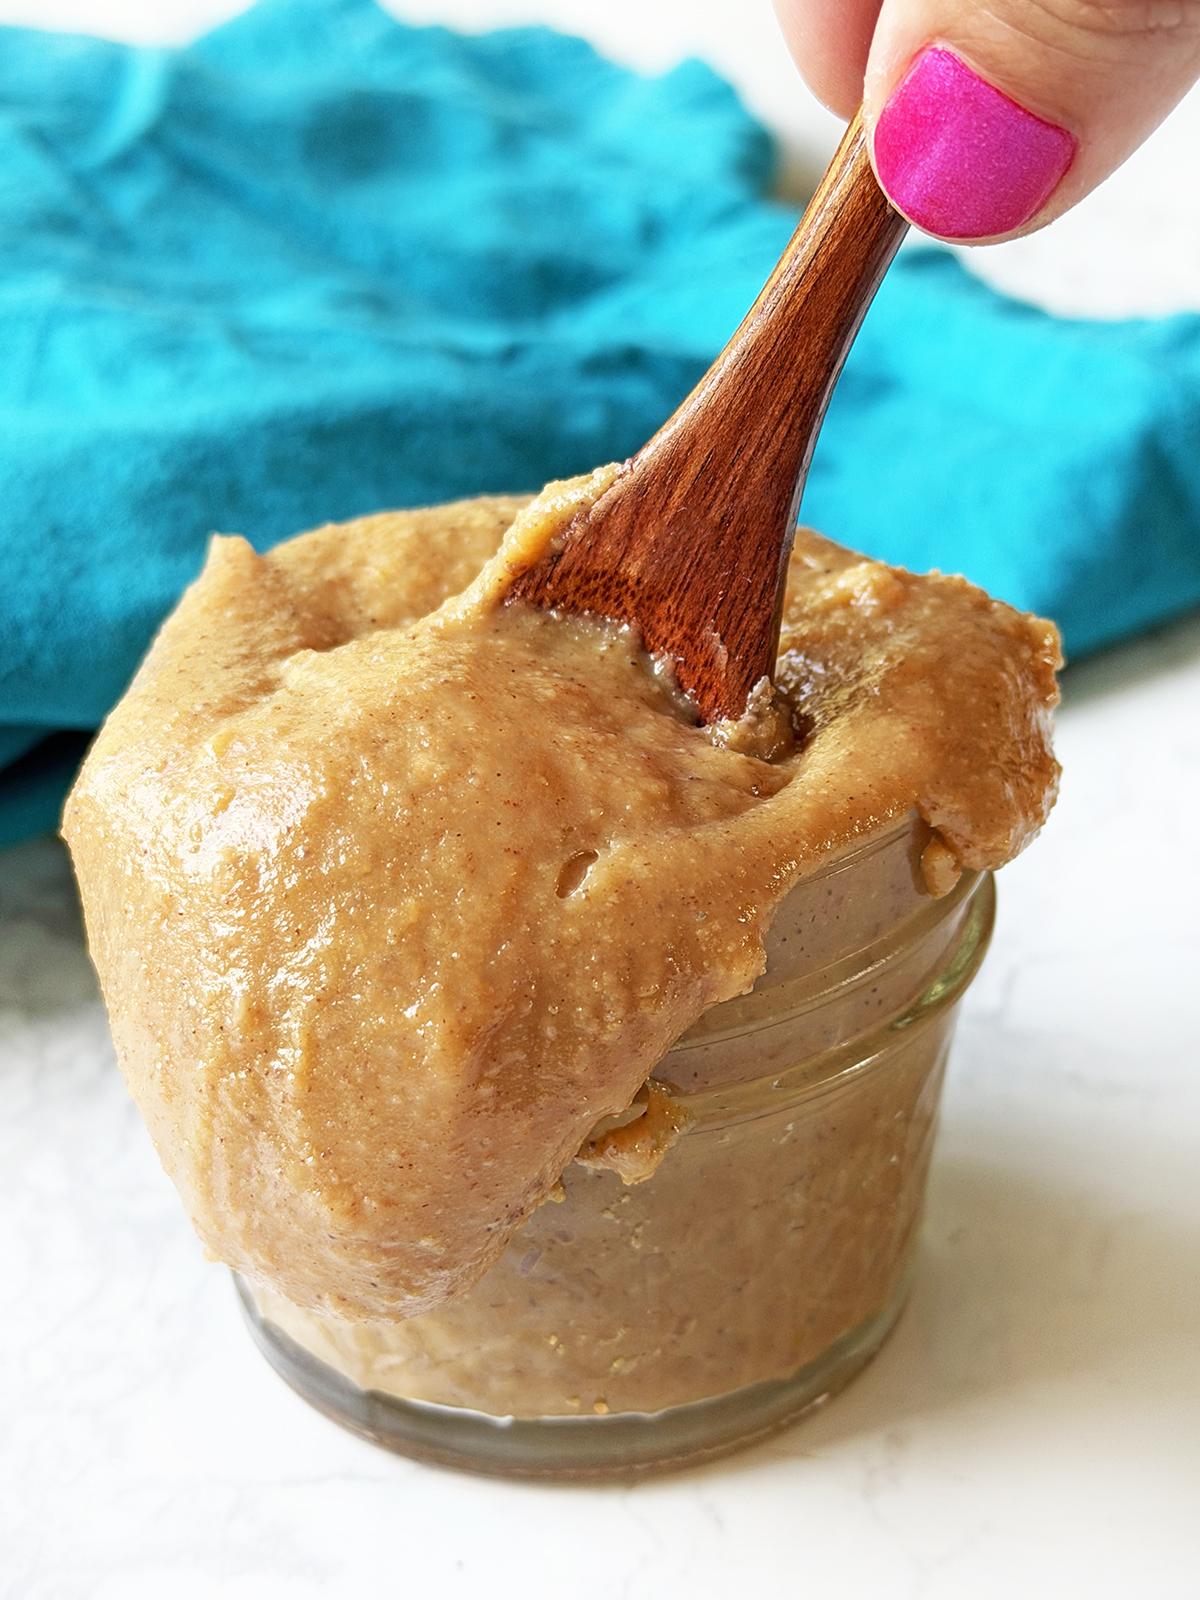
Don’t be alarmed if the dulce de leche looks a little strange at first. The surface may appear bumpy, grainy or have small holes and pockets. This is completely normal.
- Don’t panic.
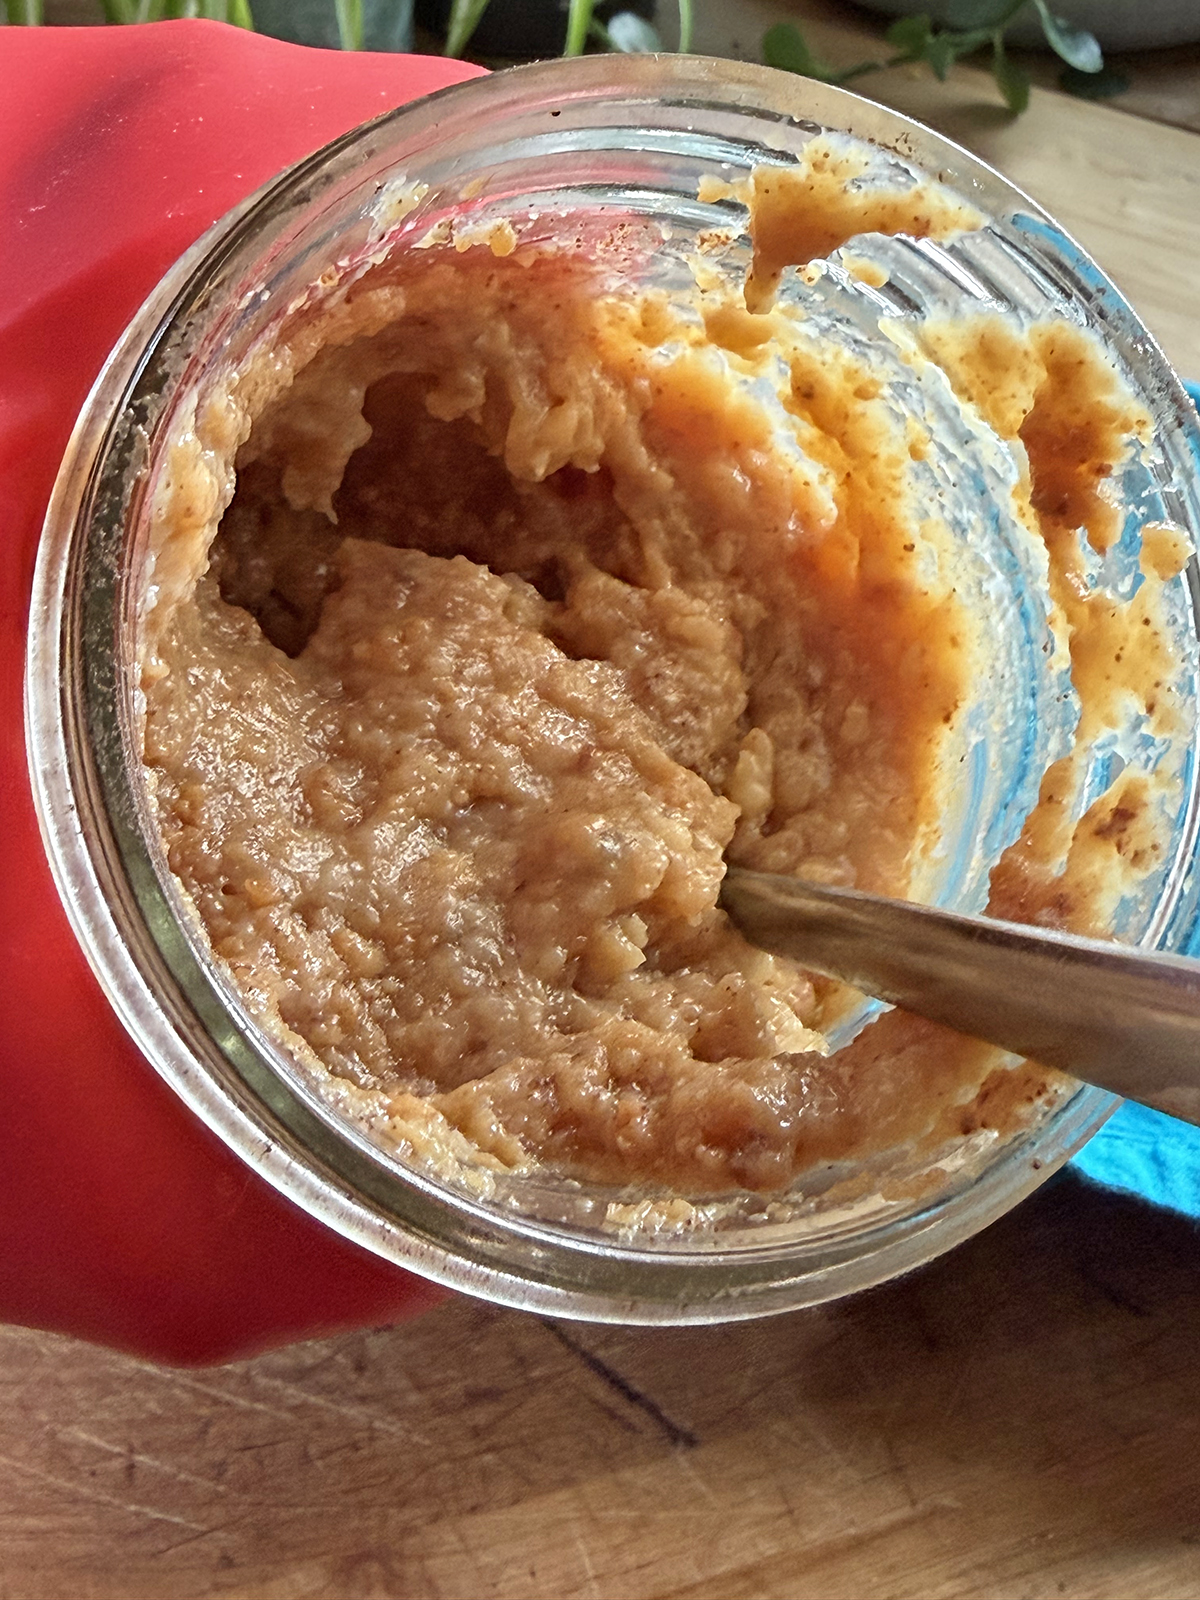
It may look a little lumpy at first. Keep stirring!
- There it is.
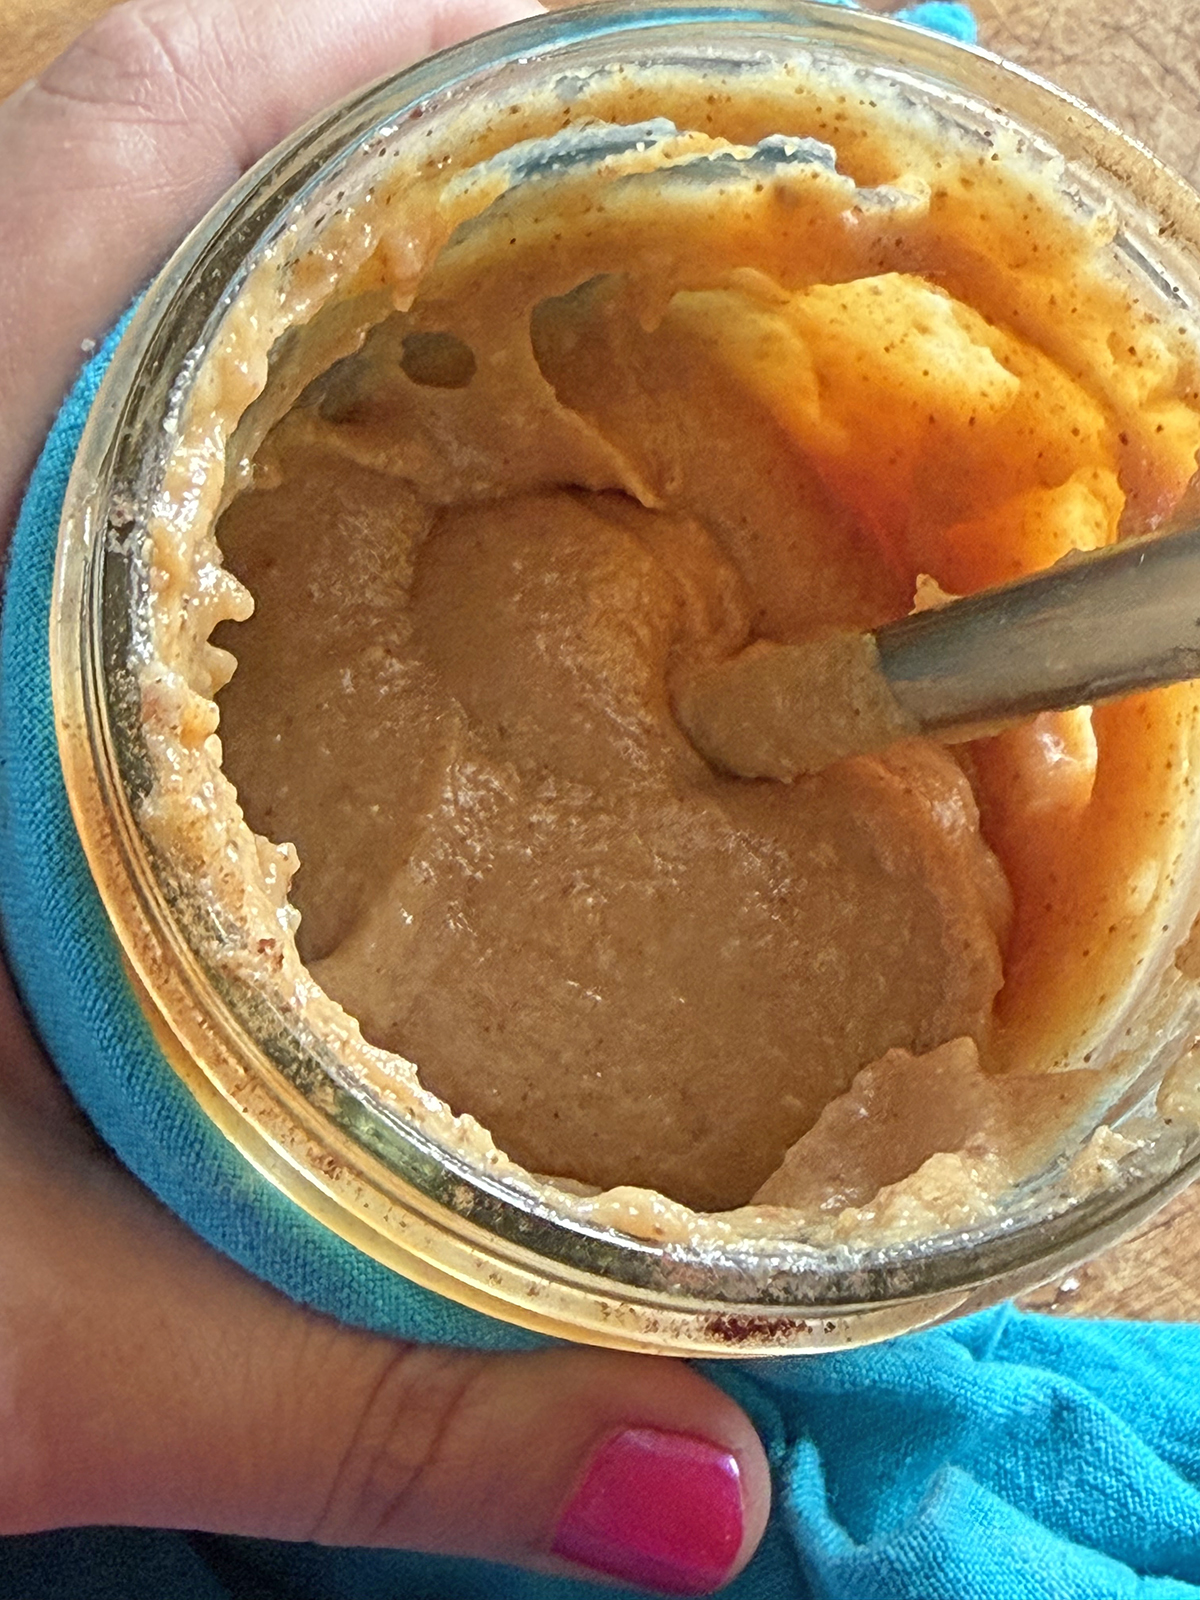
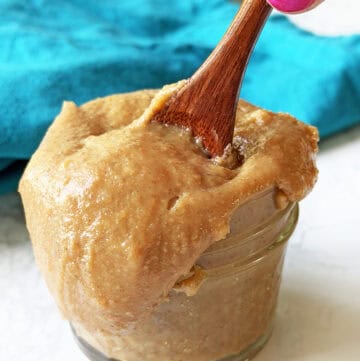
Smooth, creamy dulce de leche. Let cool completely before serving or storing.
- Store and enjoy.
Refrigerate until ready to use. When serving, warm in 30-second microwave intervals (stirring after each) as needed until it reaches your desired consistency.
Note: Don’t panic when the Instant Pot seems to be taking forever to come to pressure. With this much water in the pot, a 25- to 30-minute preheat time is completely normal and helps create that perfectly smooth, foolproof homemade caramel sauce.
Why Make Dulce de Leche in an Instant Pot?
- No stovetop monitoring
- No risk of burning
- Consistent results
- One ingredient
- Completely hands-off
Recipe Notes
- Secure the mason jar lid loosely. Tightening the lid too much can prevent pressure from equalizing properly during cooking.
- Don’t rush the natural release. The 10-minute natural release helps the dulce de leche finish cooking gently and contributes to its smooth, creamy texture.
- Expect a long preheat time. Because the Instant Pot contains a large amount of water, it may take 25 to 30 minutes to come to pressure. This is completely normal.
- Stir well after cooking. The mixture may look slightly separated when you first remove it from the pot. A thorough stir will bring it together into a silky, smooth caramel sauce.
- The sauce thickens as it cools. Freshly cooked dulce de leche will seem thinner than the finished product. After cooling and refrigerating, it will become noticeably thicker.
- Warm before serving. For a drizzleable consistency, microwave in 30-second intervals, stirring between each, until smooth and pourable.
- Storage: Store in an airtight container or the mason jar in the refrigerator for up to 2 weeks.
Megan’s Best Tip
If you’re making this for the first time, resist the urge to add extra cook time. I’ve tested this recipe over and over, and 18 minutes creates the perfect balance of rich caramel flavor and creamy texture without becoming too dark or overly thick. One button, one ingredient and perfect dulce de leche every time.
Ways to Use Dulce de Leche
- Drizzle over vanilla ice cream
- Spoon onto cheesecake
- Swirl into brownies
- Use as an apple dip
- Drizzle over pancakes or waffles
- Spread onto toast
- Stir into coffee
- Layer into trifles
- Fill sandwich cookies
- Drizzle over bread pudding
Flavor Variations
- Salted Dulce de Leche – Stir in 1/2 to 3/4 teaspoon fine sea salt after cooking. Finish with a sprinkle of flaky sea salt for an extra-special treat.
- Peanut Butter Dulce de Leche – Stir in 2 tablespoons creamy peanut butter after cooking until smooth.
- Vanilla Dulce de Leche – Stir in 1 teaspoon vanilla extract after cooking.
- Cinnamon Dulce de Leche – Stir in 1/2 teaspoon ground cinnamon after cooking. (You could add it before cooking, but after cooking gives you more control over the flavor and ensures it incorporates smoothly.)
- Espresso Dulce de Leche – Stir in 1 teaspoon espresso powder after cooking until completely dissolved.
- Chocolate Dulce de Leche – Stir in 1/4 cup semi-sweet chocolate chips while the dulce de leche is still warm.
- Pumpkin Spice Dulce de Leche – Stir in 1 teaspoon pumpkin pie spice after cooking.
- Maple Dulce de Leche – Stir in 1/2 teaspoon maple extract after cooking.
FAQ
Technically, yes, but I don’t recommend it. A mason jar is easier, cleaner and gives you a ready-made container for stirring and storing your dulce de leche afterward.
I’ve made this recipe dozens of times using the mason jar method and it works great every single time. Plus, once it’s done cooking, you can easily stir, cool and pop the jar in the fridge. No transferring, no extra dishes and no fuss.
Don’t panic! When you first remove the jar from the Instant Pot, the dulce de leche may look bumpy, grainy or even have small holes or pockets on the surface. This is completely normal.
Using a hot pad holder or kitchen towel to securely grip the hot jar, give the mixture a really good stir. As you stir, the dulce de leche will loosen up and transform into the smooth, creamy caramel sauce you’re expecting.
I’ve seen this happen countless times while testing this recipe, and it has always come together perfectly after a minute or two of stirring.
Not exactly. Traditional caramel is made by heating sugar until it caramelizes. Dulce de leche is made by slowly heating milk and sugar together, creating a richer, creamier flavor and texture.
Yes. Dulce de leche can be made on the stovetop or in the oven, but the Instant Pot method is easier, more hands-off and consistently delivers excellent results.
It likely cooled completely. Warm it in the microwave in 30-second intervals to loosen it up.
Yes. A few additional minutes of cook time will deepen the color and flavor, but 18 minutes creates the texture I prefer.
Store dulce de leche in an airtight container in the refrigerator for up to 2 weeks. The flavor actually gets even better after a day or two in the fridge.
If your dulce de leche is too thick to drizzle, microwave it in 30-second intervals, stirring between each, until it reaches your desired consistency.
Yes! Store in a freezer-safe container and freeze for up to 3 months. Thaw overnight in the refrigerator before using.
More Instant Pot Dessert Recipes
- Instant Pot Fudge
- Instant Pot Chocolate Pudding
- Pressure Cooker Dump Cake
- Instant Pot Cheesecake
- Instant Pot Cake
Instant Pot Dulce de Leche
Equipment
- Mason Jar + Lid pint size
Ingredients
- 14 oz sweetened condensed milk
Instructions
- Pour the sweetened condensed milk into a pint-sized mason jar and secure a lid loosely.
- Place a trivet inside your Instant Pot and place the jar on top, situated in the center so it is sturdy.
- Pour water into the pot so that the top of the water sits where the sweetened condensed milk is.
- Place cover on pot and set to sealing. Cook on high pressure (use the pressure cook button) for 18 minutes. Since there is a lot of liquid in the pot, it will take approximately 30 minutes before it comes to pressure. Don’t fret! It’s doing its job!
- Do a 10-minute natural release, then vent remaining pressure.
- When the silver float valve drops, remove the lid and carefully remove the jar from the pot using a hot pad holder. Remove lid and give the mixture a really good stir. Let cool to room temperature. Store in the fridge until ready to use.
- When ready to use, heat in 30-second intervals in the microwave as needed.
Video
Notes
- This homemade caramel sauce starts with just one ingredient: sweetened condensed milk.
- Use a pint-sized mason jar and secure the lid loosely before cooking.
- Because of the amount of water in the Instant Pot, it may take 25 to 30 minutes to come to pressure. This is completely normal.
- Allow a 10-minute natural release for the smoothest, creamiest texture.
- Stir thoroughly after cooking. The dulce de leche may look slightly separated at first but will become silky smooth as you stir.
- The sauce will thicken as it cools and continue to thicken in the refrigerator.
- To create a thinner, drizzleable homemade caramel sauce, microwave in 30-second intervals, stirring between each.
- Store in the refrigerator for up to 2 weeks.
- Delicious flavor variations include sea salt, vanilla extract, cinnamon, espresso powder and peanut butter.
- Use this homemade caramel sauce on ice cream, cheesecake, brownies, apple slices, pancakes, waffles and more.
Leave a Reply