
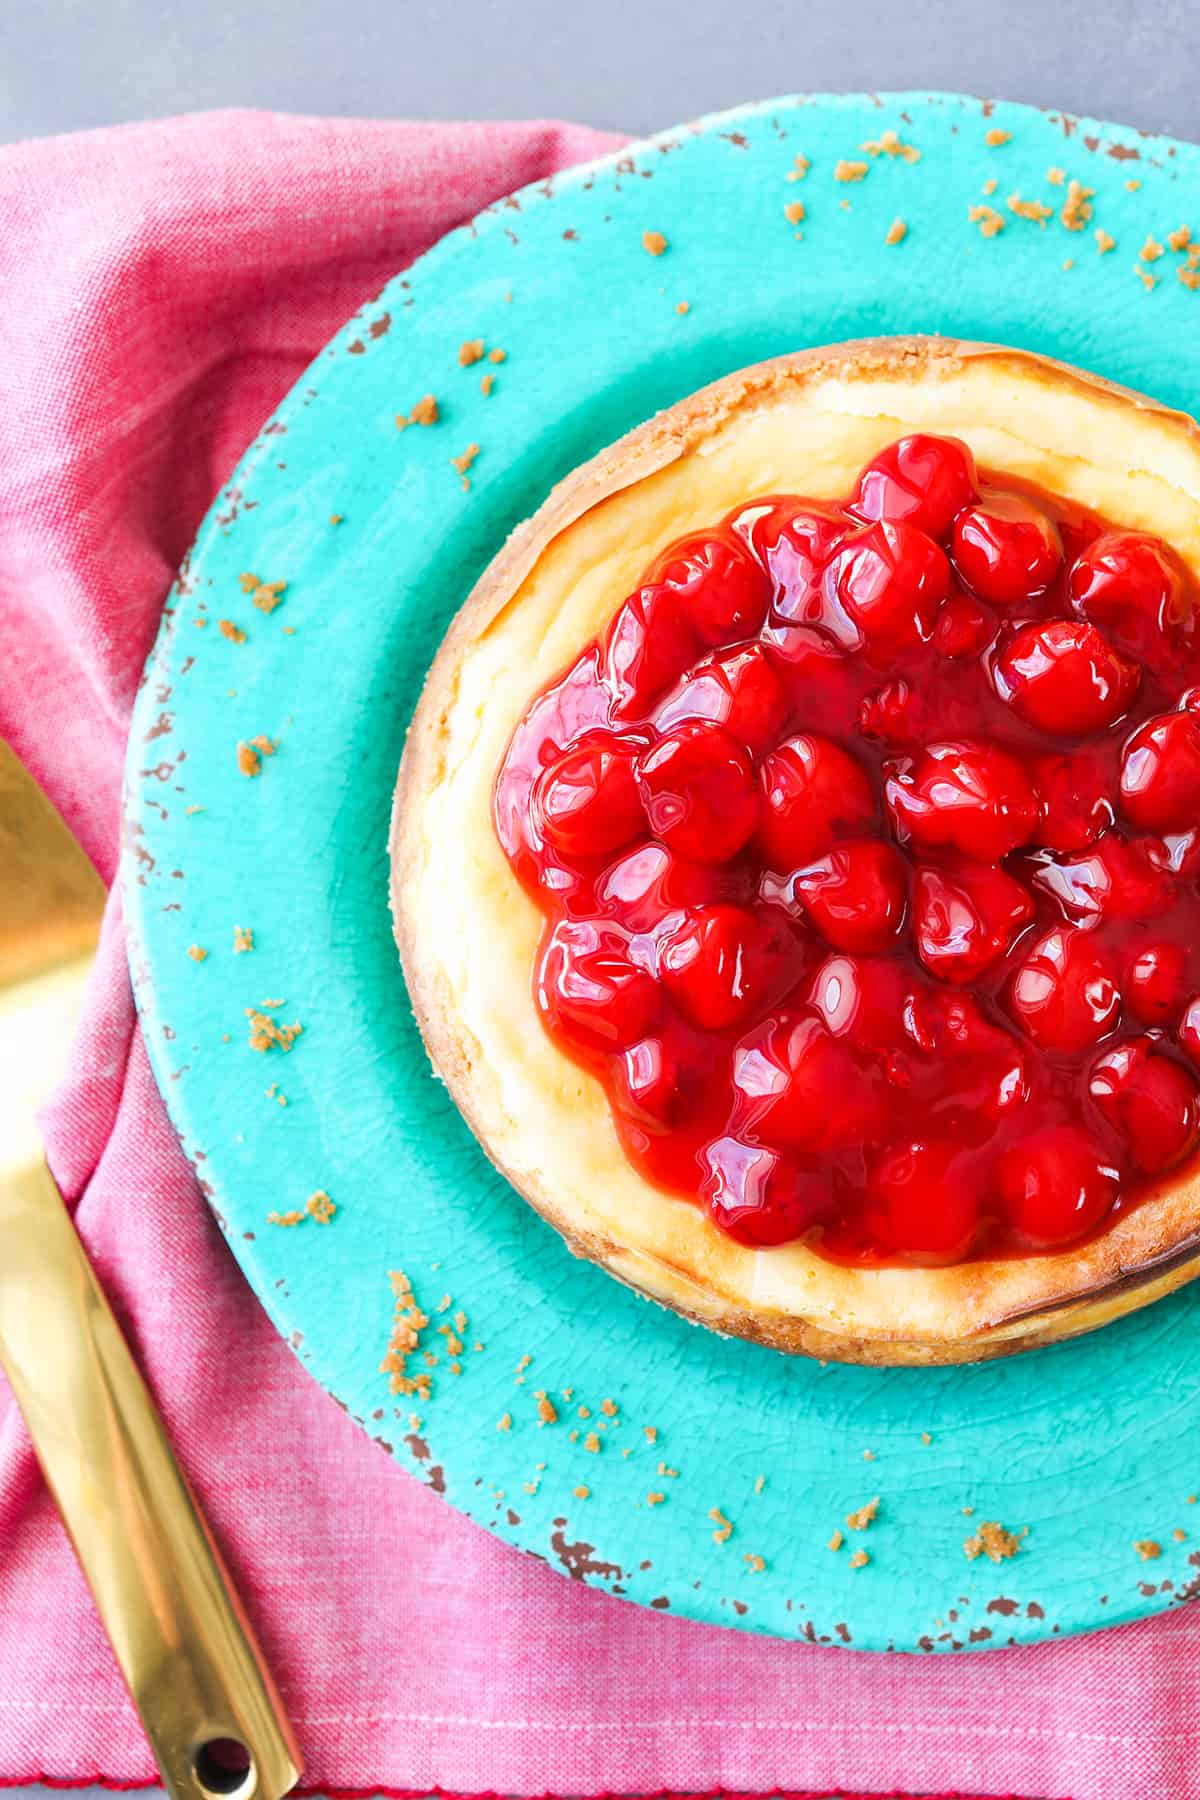
Avoid cracking and hassle by making creamy, flavorful cheesecake in your Instant Pot! This is the best Instant Pot cheesecake recipe! It cooks perfectly every time and tastes delicious served solo or with fruit, chocolate or caramel as a topping.
Another favorite creamy pressure cooker dessert is this Instant Pot Fudge.
Looking for more sweet treats? Check out my collection of the best Instant Pot desserts.
Why This Recipe Works
There is something so deliciously special about cheesecake, am I right? It is difficult to describe a really good bite of this delicious dessert in words, but I’d start with creamy, dreamy, rich, smooth and the perfect dessert of all time.
- I learned after perfecting this cake in the Instant Pot that baked goods turn out indescribably scrumptious when cooked inside a pressure cooker.
- After that cake win, I set out on a quest to make the perfect pressure cooker cheesecake and THIS IS IT.
- This recipe is a labor of love because it took a few tries to get it just right. And just right it is, my friends.
- You will knock people’s socks off by making your next cheesecake in your Instant Pot.
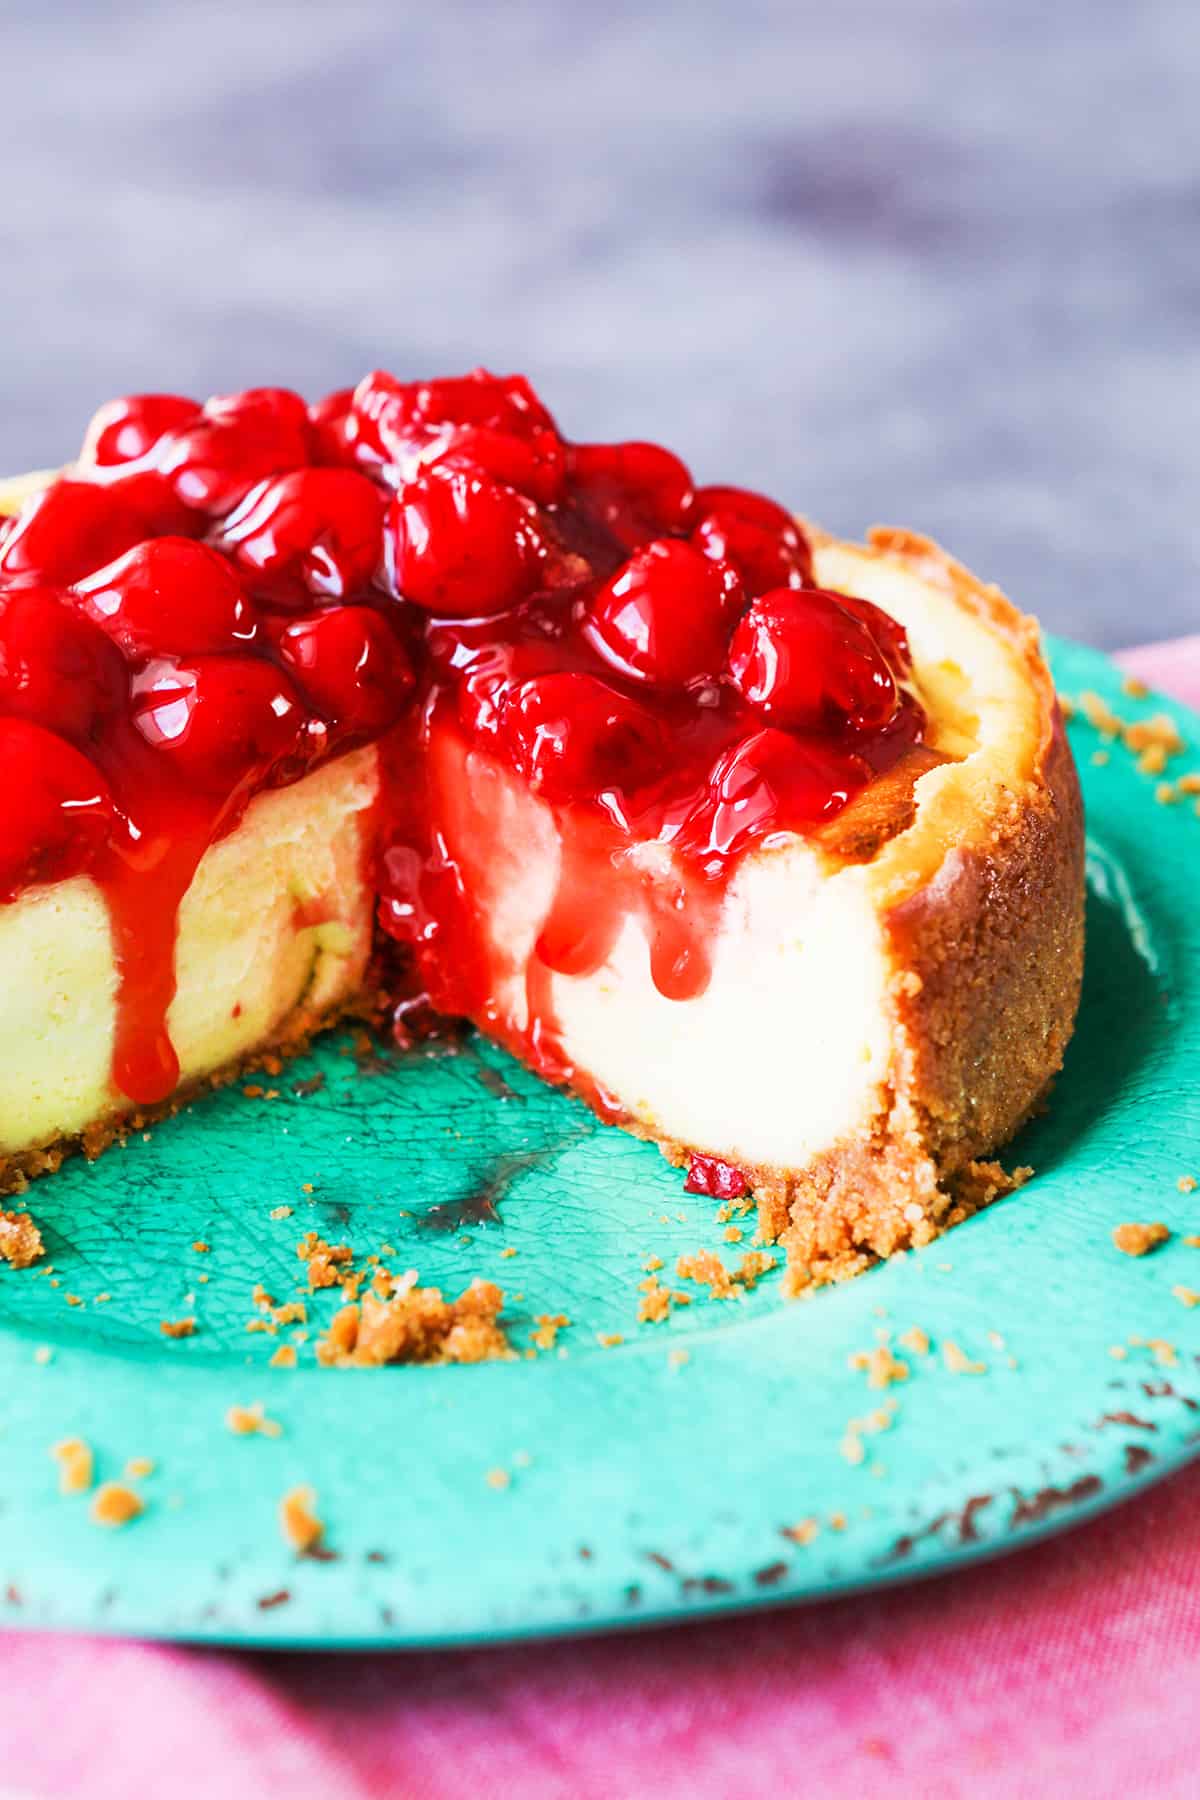
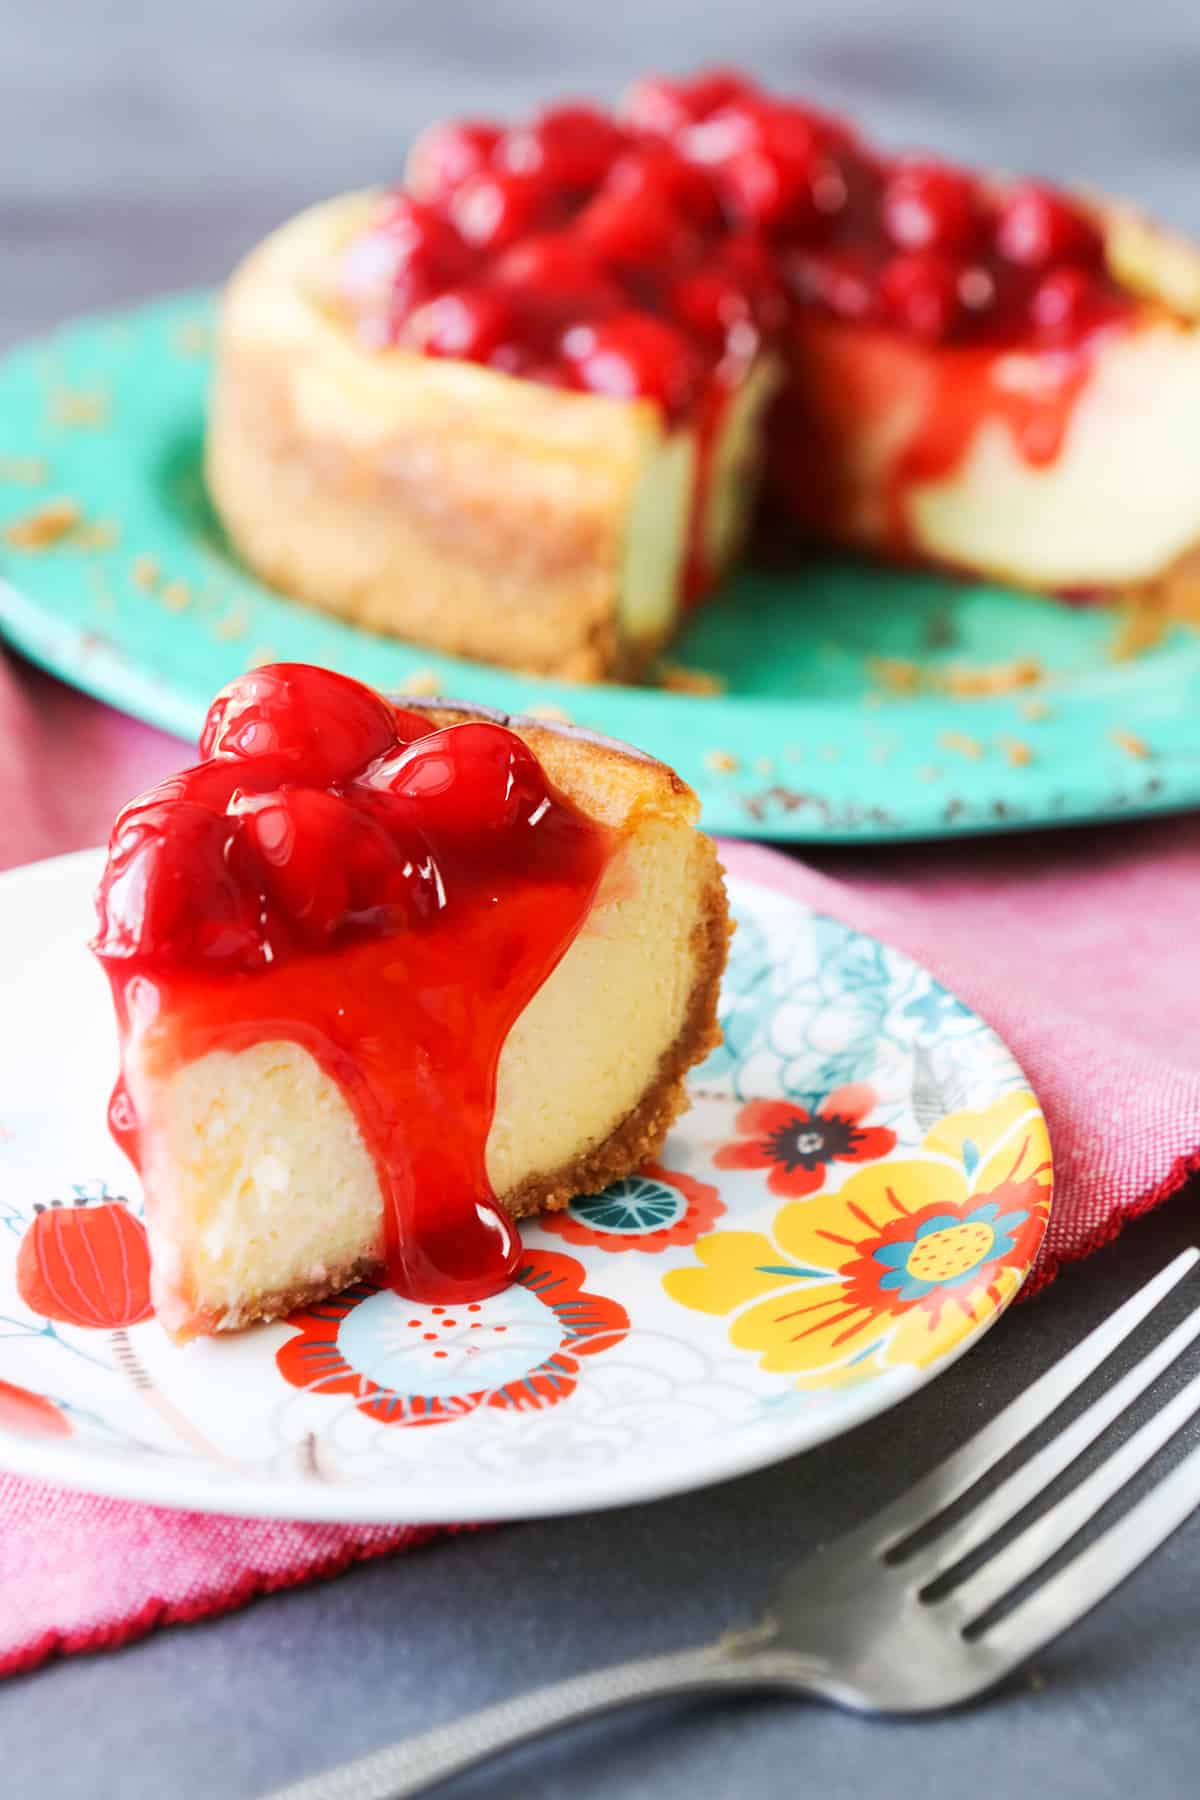
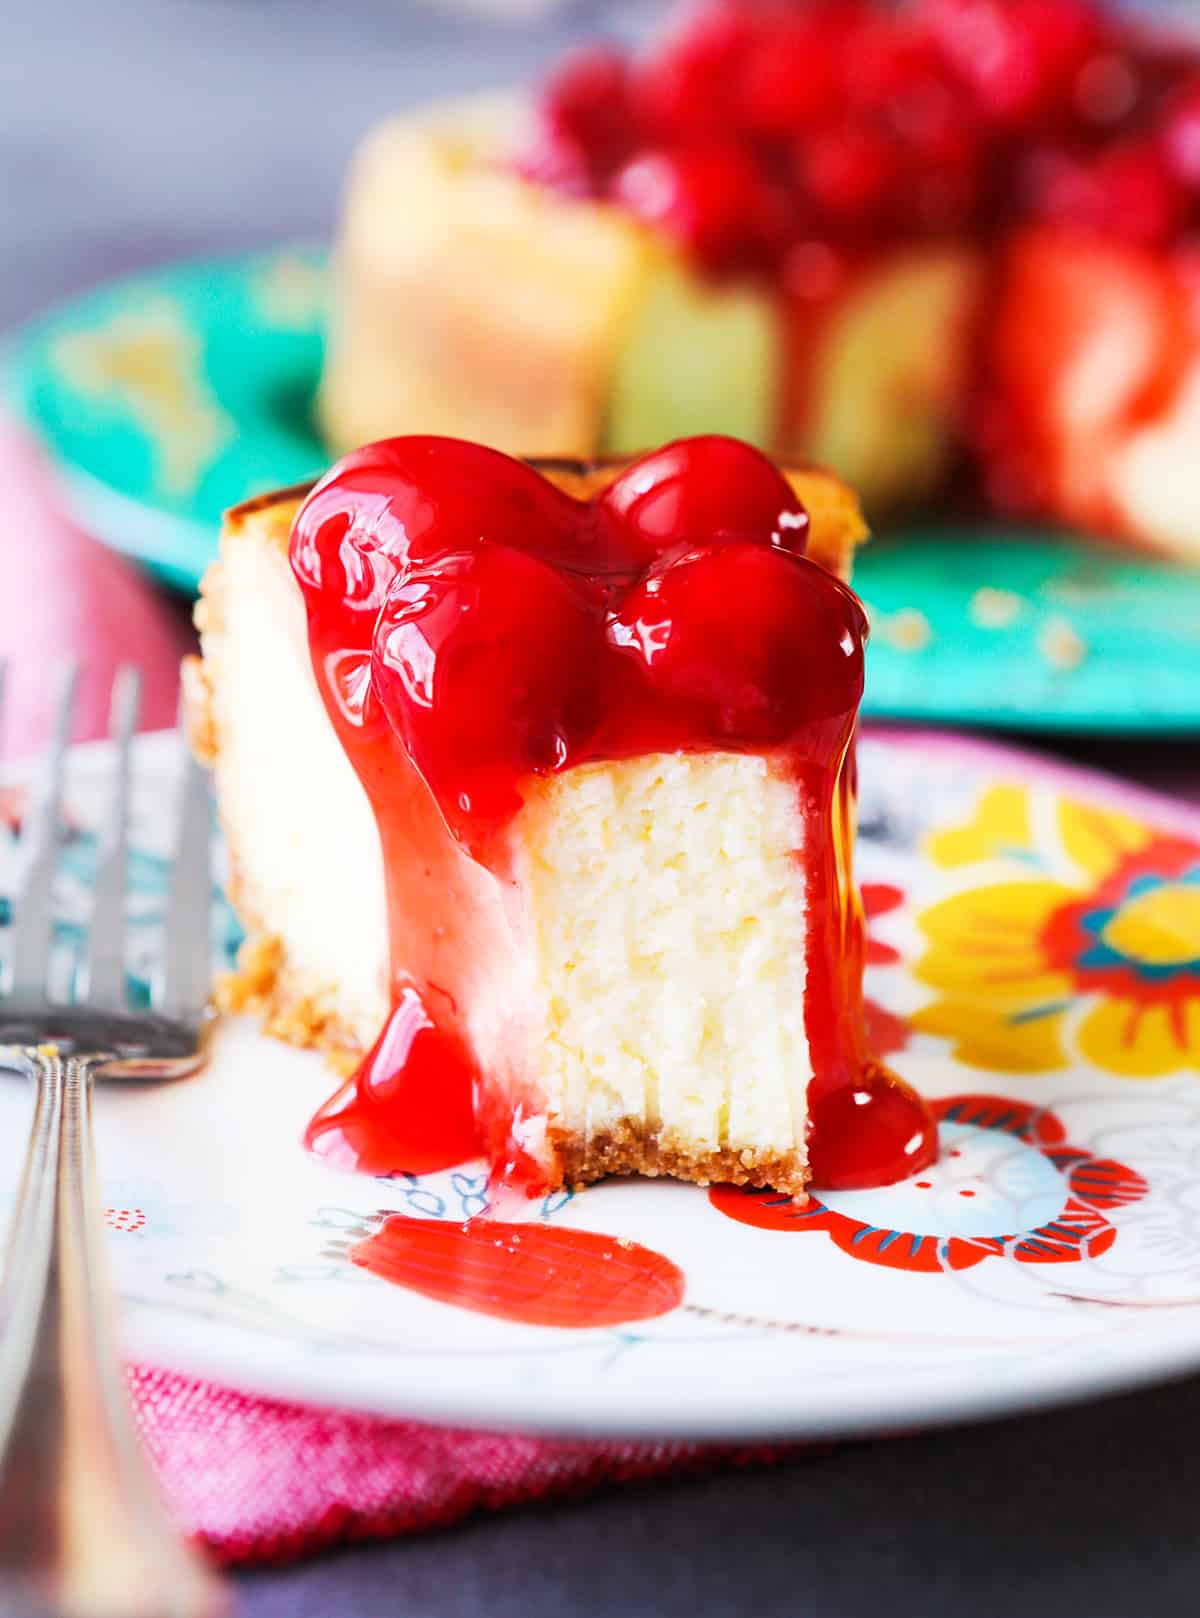
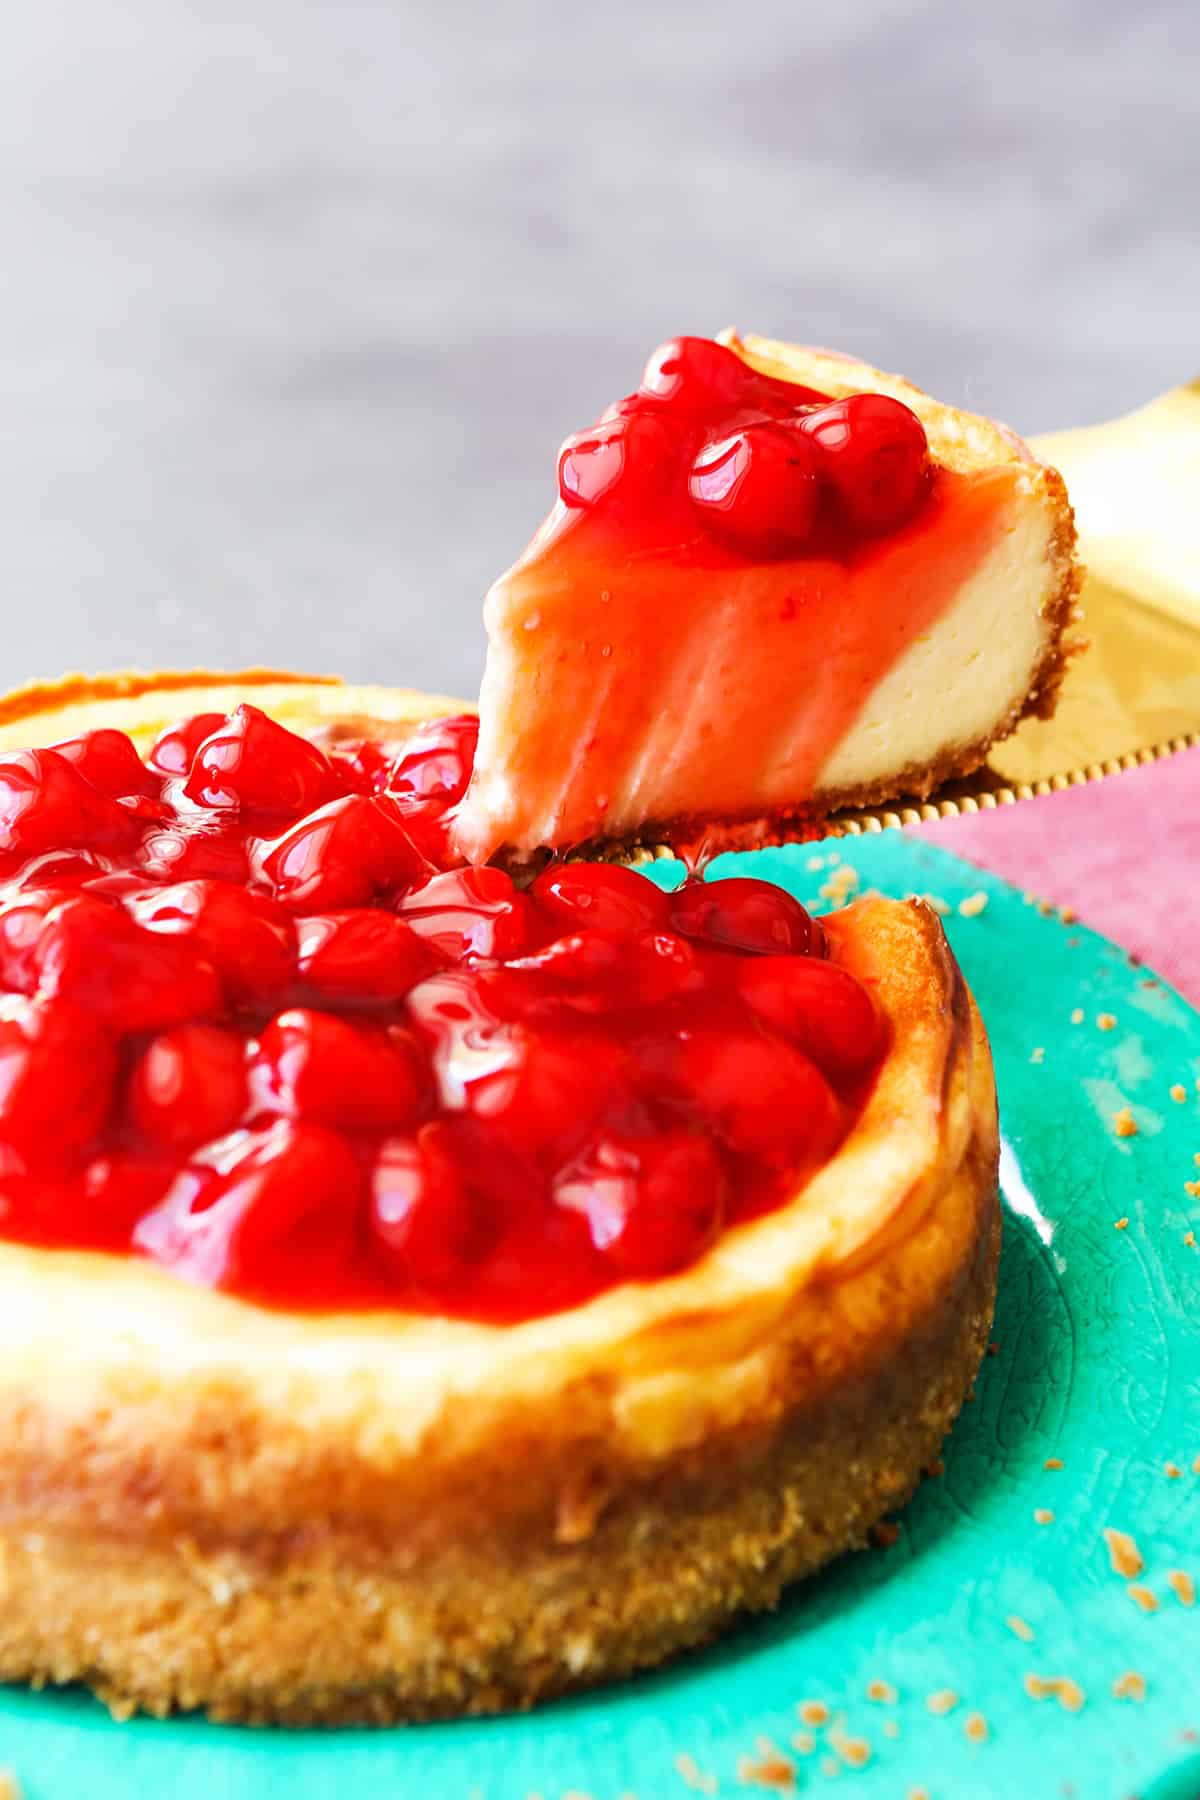
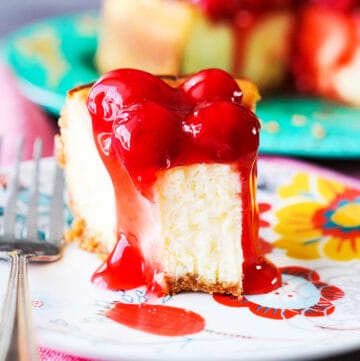
- This is the best Instant Pot cheesecake recipe you’ll find. It is SO creamy and delicious and tastes very similar to a New York cheesecake! It is one of my favorite desserts of all time.
Recipe Ingredients
Graham crackers – Use any variety of graham crackers to make the crust. Go for a gluten free variety to make it a GF dessert!
Butter – Either salted or unsalted butter will work great, but using unsalted butter gives you more control of the saltiness of the end result.
Cream cheese – Use full-fat cream Philadelphia cheese for the best, tastiest possible outcome.
Sour cream – Also here you will want to use a full fat variety for best results.
Vanilla extract – To add unique flavor to your cheesecake, replace the 1 teaspoon vanilla extract with an equal amount of a different flavored extract. Try orange, coconut, strawberry or rum extract!
Lemon zest – Replace the lemon zest with lime or orange zest instead for a delicious twist.
Toppings – Fruit filling, ganache, chocolate sauce or caramel sauce all make great toppings.
How to Make Instant Pot Cheesecake
Step 1
Pour 1 1/2 cups water into an electric pressure cooker. Wrap the bottom of the pan with foil and coat the inside with cooking spray and set aside.
Step 2
In a medium bowl, combine graham cracker crumbs, sugar and melted butter and mix to combine. Press into the bottom and 2 inches up the sides of the prepared pan. Place in the freezer for 15 minutes.
Step 3
Meanwhile, prepare the filling. Add 2 packages cream cheese along with sour cream to a large bowl or stand mixer (or use a hand mixer). Beat the cream cheese mixture on low speed until creamy. Add the sugar, cornstarch, vanilla and lemon zest and mix until fluffy and creamy, 1-2 minutes. Add the eggs and mix until just incorporated.
Pour the cheesecake filling into the prepared graham cracker crust and cover tightly with a piece of foil (spray the inside with cooking spray first). Place the pan on the trivet and lower it into the Instant Pot. Place the cover on the pot and lock the lid into place.
Set the timer to 50 minutes on high pressure (pressure cook setting). It will take the Instant Pot around 7 minutes to build up pressure before it begins cooking.
Step 4
When cooking time is done, do a natural release to get rid of remaining pressure in the pot (this will take approximately 30 minutes).
Step 5
Remove the cover and pull the pan out by holding onto the handles of the trivet in the bottom of the pot. Remove the aluminum foil and transfer to a wire rack to cool to room temperature.
Cover with foil or plastic wrap and refrigerate until ready to serve, a minimum of 1 hour. Top with fruit filling, ganache or caramel sauce if desired, just before serving.
Recipe Notes
- You will need to use either a 6 inch or 7 inch springform pan to make this recipe. I personally think a 7-inch pan is the perfect size.
- The filling for this luscious cheesecake fills up a 7-inch cheesecake pan (spring form) really full, so pour carefully if you only have a 6-inch pan.
- When you remove the foil from the top of the cheesecake after it is done cooking, you may find that a bit of moisture has accumulated inside the pan. No worries! Simply dab the top lightly with a paper towel to remove the moisture.
- Before creating the crust mixture, pulse the graham crackers in a food processor to create fine crumbs, if desired.
- Always use room temperature ingredients when baking. This includes cream cheese, eggs and butter.
- Crush Oreos in place of graham crackers to create a scrumptious oreo cookie crust.
Substitute for Cream Cheese in Cheesecake
There are a handful of substitutes that you can use in place of cream cheese in cheesecake. Here are a few options:
Greek yogurt – This is an excellent substitute for cream cheese in cheesecake. The texture is very similar to cream cheese and the tangy flavor complements the sugar in the recipe.
Cottage cheese – Another good substitute for cream cheese in cheesecake is cottage cheese. Blend it beforehand to make it smooth and it will taste delicious.
Tofu – Silken tofu is a great a vegan-friendly option for substituting cream cheese in cheesecake. Blend or puree it to create a creamy filling.
Ricotta cheese – Ricotta can also be used in place of cream cheese in some cheesecake recipes. It has a slightly different flavor and texture, but it still adds creaminess and richness to the recipe.
Note: These alternatives may alter the taste and texture of your cheesecake.
Can You Use a Springform Pan in an Instant Pot
You can definitely put a springform pan inside a pressure cooker. Just be certain that the pan fits inside the Instant Pot prior to cooking.
How To Remove Cheesecake From Springform Pan
There are a few tricks you may employ that will help you remove your cheesecake from the springform pan without ruining it!
- Allow it to cool completely to room temperature, then cover and refrigerate for a minimum of 2 hours. This will firm it up nicely.
- Run a large sharp knife around the edges. This will help easily separate the cake from the sides of the pan.
- Open the latch on the springform pan and gently lift the attachment ring from the base. If parts of the side are still sticking, pause and gently run a knife along the side to loosen it.
- Once the ring attachment is removed, slide a long sturdy spatula between the crust and the bottom portion of the pan. Gently transfer to a cake stand.
Note: If it sticks to the pan, place the entire cheesecake pan on a warm surface or inside a shallow warm water bath for 10 minutes.
How To Store Cheesecake
Tightly wrap cooled cheesecake in plastic wrap or foil and store it in the refrigerator for up to 5 days.
Cheesecake freezes extremely well! Wrap the cheesecake tightly in foil and place inside a resealable freezer bag or airtight container for up to 6 months. When you are ready to enjoy the cheesecake, allow it to thaw completely in the fridge overnight.
How Long Does Cheesecake Last in the Fridge
When stored properly in an airtight container in the fridge, prepared cheesecake will stay fresh for up to 4 days.
Can Dogs Eat Cheesecake
Small amounts of cheesecake are safe for most dogs to eat. If you have a dog with allergies or if given in large quantities, you should avoid giving this dessert to your pup.
Should I Use Salted or Unsalted Butter For Cheesecake
Many bakers use unsalted butter in their baked goods in order to have more control over the saltiness of the end result.
If you prefer adding that extra salty touch to your baked goods, use half salted and half unsalted!
How Long Does Sour Cream Last
How long does sour cream last? If you have a container staring at you from inside your refrigerator and you don’t know whether to toss or eat.. read on!
Cheesecake Toppings
There are so many different toppings that taste delicious when piled on top of a really great cheesecake. Here are a few ideas to get you started!
- Canned or fresh fruit (strawberries, blueberries, peaches, apples, blackberries, cherries)
- Strawberry Sauce
- Blueberry Sauce
- Chocolate Ganache
- Salted Caramel Sauce
- Chopped or crushed cookies or candy bars
- Whipped cream, cherries and chocolate for a black forest cheesecake
Ultimate Cheesecake Recipes
Best Instant Pot Recipes
- Make a comforting, hearty Goulash for dinner!
- Making Instant Pot Chicken Noodle Soup will save you time from simmering soup on the stove all day and produce a perfectly tasty, healthy soup.
- Put your pressure cooker to work by transforming a box cake into a perfect Cake!
- Packed with turkey meat, white beans and veggies, this White Turkey Chili quickly becomes a dinner favorite!
Why Does it Take My Instant Pot So Long To Pressurize?
The time leading up to actual cook time may seem long and even confusing (“What is going ON in there?!”), but it’s an important part of the process! The Instant Pot is working on building up the appropriate amount of pressure that it will be pressure cooking the food at.
It handles liquids and solids differently and also fresh and frozen differently, so the time can vary. Most recipes take between 10 and 25 minutes to build up pressure.
How To Clean An Instant Pot
Keep your Instant Pot shiny, clean and scent-free by following these simple steps:
Exterior
Use a clean, damp cloth to wipe down any grease or gunk on the outside of the Instant Pot. Use a brush or the edge of a clean cloth to reach inside the rim to remove food that may have gotten stuck in the grooves. The exterior “housing” should never ever be immersed in liquid or run underwater.
Inner Pot
The stainless steel inner pot can be hand-washed OR run through a dishwasher. See below tips for deep cleaning when needed.
Cover
The inside of the IP cover can usually just be wiped down with a clean cloth after use. If there is food stuck to the inside of the cover, remove the sealing ring and run the cover under hot water and scrub with a brush or cloth.
Sealing Ring
The sealing ring can be easily removed from the Instant Pot and hand-washed with warm, soapy water OR run through a dishwasher when needed.
Trivet
The trivet that is inserted into the Instant Pot can be scrubbed with a brush, hand-washed with warm, soapy water or run through a dishwasher.
Deep Clean
If the inner pot starts to show signs that it needs a deep cleaning (cloudiness or discoloration), pour either 2 cups of white vinegar OR 2 cups of water plus 1 tablespoon of lemon juice into the pot. Place the cover on the pot and set to STEAM for 3 minutes.
Let the pressure release naturally and remove the cover. Remove sealing ring and inner pot and allow to air dry.
Will you help add value to Pip and Ebby?
If you make this recipe and love it, stop back and give it a 5-star rating ⭐️⭐️⭐️⭐️⭐️ and leave a comment. THANK YOU!
Best Instant Pot Cheesecake Recipe
Ingredients
- 1 1/2 cup graham cracker crumbs 9 crackers
- 3 tbsp granulated sugar
- 1/4 cup salted butter melted
- 16 oz cream cheese softened
- 1/2 cup sour cream
- 2/3 cup granulated sugar
- 1 tbsp cornstarch
- 1 tsp vanilla extract
- 2 tbsp Lemon zest
- 2 eggs
- 1/2 cup Fruit filling, ganache or caramel sauce for topping, optional
Instructions
- Pour 1 1/2 cups water to Instant Pot. Wrap the bottom of a 6- or 7-inch springform pan with foil and coat the inside with cooking spray; set aside.
- In a medium bowl, combine graham cracker crumbs, sugar and butter and mix to combine. Press into the bottom and up sides of the prepared pan. Place in freezer for 15 minutes.
- Meanwhile, prepare the filling. Add the cream cheese and sour cream to a large bowl and mix using a hand mixer until creamy. Add the sugar, cornstarch, vanilla and lemon zest and mix until fluffy and creamy, 1-2 minutes. Add the eggs and mix until just incorporated.
- Pour the filling into the crust and cover tightly with foil (spray the inside with cooking spray first). Place pan on the trivet and lower into the Instant Pot. Place the cover on the pot and set timer to 50 minutes on high pressure (pressure cook setting). It will take the IP around 7 minutes to build up pressure before it begins cooking.
- When cooking is done, let the Instant Pot release pressure naturally to get rid of remaining pressure in the pot (this will take approximately 30 minutes).
- Remove cover and pull trivet/pan out. Remove foil and allow cheesecake to cool to room temperature. Cover with foil and refrigerate until ready to serve, a minimum of 1 hour. Top with fruit filling, ganache or caramel, if desired, just before slicing and serving.
Video
Notes
- You will need to use either a 6 inch or 7 inch springform pan to make this recipe. I personally think a 7-inch pan is the perfect size.
- The filling for this luscious cheesecake fills up a 7-inch cheesecake pan (spring form) really full, so pour carefully if you only have a 6-inch pan.
- When you remove the foil from the top of the cheesecake after it is done cooking, you may find that a bit of moisture has accumulated inside the pan. No worries! Simply dab the top lightly with a paper towel to remove the moisture.
- Before creating the crust mixture, pulse the graham crackers in a food processor to create fine crumbs, if desired.
- Always use room temperature ingredients when baking. This includes cream cheese, eggs and butter.
- Crush Oreos in place of graham crackers to create a scrumptious oreo cookie crust.
This Instant Pot cheesecake recipe looks amazing! Perfectly creamy and easy to make. Can’t wait to try it out—thanks for sharing!
This has to be the most bizarre collection of ingredients i have ever seen and it be called a cheesecake.
Really? I make cheesecake on the regular. Graham crackers, eggs, butter and cream cheese are all standard ingredients. It’s modified for the IP and one of the most tasty desserts I’ve enjoyed because the pressure really combines the ingredients together in a magical way. I hope rather than peek at ingredients, you judge a recipe by making it and tasting it!
Hi Megan,
I made your I.P. cheesecake today and it was delicious. My husband loved it! I had a question, though. When the I.P. had finished its 50 minutes and vented naturally, I took the cheesecake out and it was soft, wet, and jiggly in the middle. I let it cool awhile to see if it would firm up, but it didn’t. So I put it back into the I.P. for another 20 minutes and it was much firmer. We live in the UK and I haven’t been able to find the 8 oz blocks of Philly that I used to get in the US. All I could get was tubs of the softer Philly. I calculated how many grams I’d need and weighed it. I wondered if my soggy middle the first time around might be due to the different cream cheese texture? I did use the reduced fat variety, too. Do you suppose it would be firmer if I were to add an extra egg next time I make it? Thanks for all the lovely I.P. recipes. I’ve only had mine for less than a month, and I’m amazed at the quality of the meals I’m turning out!
Hi Phyllis! Thank you for trying my recipe and sharing your results. Here in the US we have what’s called "whipped cream cheese" and it’s light and airy, perfect for spreading on a bagel but it’s not baking quality. It doesn’t hold its structure for cooking or baking, it melts easily and is wet. So to answer your question, I believe that your cream cheese would be the result of the different type of cheese called for in this recipe. Even if it was the correct weight, it wouldn’t be thick enough. So I’m surprised and glad that it did thicken up for you after further cooking! That’s a win. I imagine an egg would help but I’ve never tried it so please let me know if you do. That’d be a good tip to pass along for more than one reader.
I almost wonder if when using the European Cream Cheese if adding more cornstarch or flour to firm it up would help instead of the egg? I learned to make cheesecake from a friend that made the best Cheesecake ever! Many times when he had a request for low fat or fat free cream cheese he had to add extra stabilizer like cornstarch or flour to make up for the moisture. I know that certain ingredients added to the cheesecake also requires the addition of more Corn Starch or flour so the soft cream cheese might to. I do believe there is a version of our cream cheese in Europe but it goes by another name. You may want to ask on a US/UK blogger what you should look for or buy that is the equivalent of US Cream Cheese available in the UK.