

Two of my favorite things in a single dessert: cookies & cream and fudge! This whipping cream fudge is super easy to make and a great treat to bring to holiday parties!
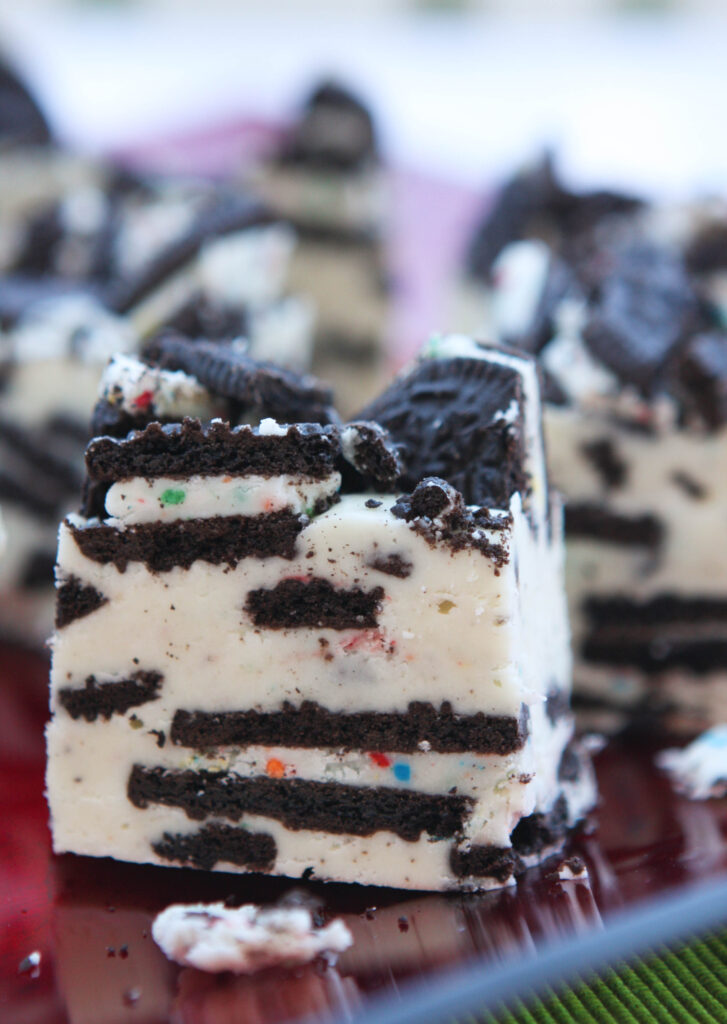
You now officially have the recipe for the BEST FUDGE EVER. Can sinful and heavenly be used in the same sentence? You absolutely when talking about whipping cream fudge and then throwing cookies and cream into the mix! You must put this recipe on your holiday baking list. Except, please don’t bake it and leave me a nasty comment because it turned into an inedible brick of sugar.
ONTO THE RECIPE!
How To Make Whipping Cream Fudge
Step 1
Line an 8×8-inch pan with aluminum foil, making sure there is overhang on at least two sides. Smooth out the wrinkles on the bottoms and sides with your hands. Coat the foil generously with PAM Cooking Spray. Set the pan aside.
One of the most enjoyable parts of making this recipe was choosing a festive package of Oreo cookies (15.25 oz.). Have you seen the plethora of filling options that are available these days? I chose the Birthday Cake variety and it was a solid choice. Any of them will work well, I am confident.
Step 2
Coarsely chop the entire package and set the irresistable pieces of cookie aside.
Step 3
In a medium saucepan, combine:
1 stick salted butter
2 cups granulated sugar
1 cup heavy whipping cream
Place the pan over medium-high heat and bring to a boil, stirring so the mixture is smooth and does not burn. Boil for 4 minutes, stirring constantly, and remove the pan from the heat.
Step 4
Add:
7-oz. container marshmallow creme
11-oz. bag white chocolate chips
1 teaspoon almond extract
Stir until the mixture is smooth.
Fold in 2/3 of the chopped cookies (you will need the other 1/3 in a bit, so don’t eat them!).
Step 5
Pour the mixture into the prepared pan and top with the remaining cookie pieces.
Place the pan in the refrigerator and chill for 4 to 6 hours, or until the fudge is completely set.
Step 6
Holding onto the foil, remove the block of fudge from the pan and place it onto a flat surface. The foil will easily peel off the fudge on the sides and bottom! I was able to immediately place the pan back into my cupboard, as there was not a bit of food on it!
Place the fudge onto a cutting board and cut into 1-inch squares. Store in a sealed container in the refrigerator.
See? BEST FUDGE EVER. You’re welcome!
Cookies and Cream Fudge
Ingredients
- 1 stick salted butter
- 2 cups granulated sugar
- 1 cup heavy whipping cream
- 11 oz white chocolate chips
- 7 oz marshmallow creme
- 1 tsp almond extract
- 15.25 oz Oreo cookies coarsely chopped
Instructions
- Line a square 8×8-inch pan with aluminum foil, making sure there is overhang on two sides. Smooth out the wrinkles on the bottoms and sides. Coat generously with PAM cooking spray and set aside. In a medium saucepan, combine the butter, sugar and heavy cream. Place over medium-high heat and bring to a boil, stirring so the mixture is smooth. Boil for 4 minutes, stirring constantly, and remove from the heat.
- Add the marshmallow crème and almond extract and stir until smooth. Add the almond extract and mix well. Fold in 2/3 of the chopped cookies. Pour the mixture into the prepared pan and top with the remaining cookies. Place the pan in the refrigerator for 4 to 6 hours, or until fudge is completely set.
- Holding onto the foil, remove the fudge from the pan and place onto a flat surface. Peel the foil from the fudge and place fudge onto a cutting board. Cut into 1-inch pieces. Store in an air-tight container in the refrigerator.
My tip is to add a bit of yogurt or sour cream to muffin and cupcake recipes. It keeps them irresistibly moist. Also, you can never have too much vanilla extract!
Always have a few throwaway cameras around, in addition to your fav camera/i-phone. Moments fly away – and having a simple camera handy just makes them stand still for your tomorrows! It's kind'a like the confetta in the fudge that stands out… you've captured that so beautifully – we'll never forget it!
https://twitter.com/HappyTina0115/status/413875459416264704
i use slow cooker to save my time
Only one word is necessary…AWESOME!
Tweet: https://twitter.com/sharonjo2/status/412447584980983808
My holiday tip is go through your pantry/freezer/refrigerator at the beginning of the holiday season and make an inventory of what you have on hand, then gather the recipes you plan to make and get all the groceries you will need. It saves so much time to have things on hand, rather than making numerous trips to the store for something halfway through a recipe. Thank you!
tweet–https://twitter.com/WildOrchid985/status/411670241538625536
My favorite tip is to do as much prep in advance, such as chopping veggies all at one time, so they are ready to go.
Thanks for the chance to win!
wildorchid985 at gmail dot com
YUM this looks good! My favorite tip is to mix pre and home made, a brownie mix or cake mix base has lots of possibilities.
My tip is to make cookie dough ahead of time and then freeze it for when you want freshly baked cookies
My tip is to reread recipes at least twice! I find that as I do so, I can internally plan to be as efficient as possible without leaving out any steps or getting delayed in the process!
The holiday season is when I make the most pies. I have discovered a trick that makes rolling out pie crust "a piece of cake". I dampen my work surface using a dish cloth, then lay a sheet of plastic wrap over the damp surface. Then I place my disk of pastry dough on the plastic wrap and then place another sheet of plastic wrap over the dough. I roll out the dough, using my favorite rolling pin. Once the dough is the desired size and thickness, I peel back the top sheet of plastic wrap. (If it is my top crust that I am rolling out, I cut my decorative steam holes in the pastry at this time.) I lift the bottom sheet of plastic wrap, crust and all, and turn it over into my waiting pie pan. It's easy to reposition the crust if necessary while the plastic wrap is still in place. Once the crust is in position, just gently peel the remaining sheet of plastic wrap from the pastry dough. There you have it! My favorite holiday pie baking tip! No mess, no fuss, perfect pie crusts every time! As a side note, I make gluten free pie crusts for our family and this keeps the dough from sticking or falling apart when using alternative types of flour.
Totally made this last night with red Holiday Oreos… The red sort of marbled it's way through the fudge. Looks and tasks better than I imagined! Now I have to hide it so I don't eat the entire batch. Oh I also split the mix between 2 8×8 pans sprayed with Pam and it makes perfect sized pieces. Thanks again for sharing!!
We have so many Christmas baking traditions- decorated sugar cookies, wreathes made from cornflakes, Chex Mix, etc. 🙂 My best tips are to make double batches and freeze!
chambanachik at gmail dot com
Never bring a new recipe to a holiday party that you have not tried out before!!
my tip is to line your cookie sheets with tin foil or parchment paper to make clean up easy when making your Christmas cookies
[email protected]
Tweet link: https://twitter.com/shala_darkstone/status/409843593260433408
I save time by making a lot of slow-cooker recipes. I also get my daughter to help a lot in the kitchen.
My tip is to read the recipe all the way through before beginning — keeps you from scrambling to do something midway!